
Developer resume generator
A high quality resume in 5 minutes - automatically generated from your gitconnected profile
React & Redux Tutorial - Build a Hacker News Clone
Build a production React project using Redux and Styled Components. Deploy the app using GitHub pages.
In this tutorial, we are going to build a production-quality Hacker News clone. We will walk through the steps of initializing the application, adding Redux to manage state, building the UI in React, and deploying the solution to GitHub pages. We will style the application using styled-components and call the public Hacker News API using the axios library.
Download Hacker News Clone as a Chrome Extension (it’s awesome!)

If you prefer video, you can also follow along with this tutorial on our YouTube. http://www.youtube.com/watch?v=oGB_VPrld0U&index=2&list=PLTTC1K14KAxHj6AftnRUD28SQaoVauvl3

Initialize the Project
We will use create-react-app to start the project. This allows us to build React applications without worrying about the configuration. First, make sure you have create-react-app installed.
npm i -g create-react-appInitialize your project by running the command below. create-react-app installs all the essential packages to build a React application and it has default scripts to manage development and building for production.
create-react-app hn-clone
# Wait for everything to finish...
cd hn-clone
Now let’s install the core packages that we will need. I’m using yarn but if you have npm just replace the yarn add with npm install.
yarn add redux styled-components react-redux redux-logger redux-thunk axioscreate-react-app uses the NODE_PATH environment variable to create absolute paths. We can declare environment variables in the .env file and create-react-app will recognize it and apply it using the dotenv library.
# Create a .env file using the touch command
touch .env

# Inside the .env file add:
# NODE_PATH=src
If you are unfamiliar with this pattern, it will make more sense when we start building the application. What it allows you to do is directly import files without needing trace your folder paths. Something like this ../../components/List becomes components/List — much more convenient.
Folder Structure
Inside src, let’s update our folder structure to be more scalable and usable for a production application.
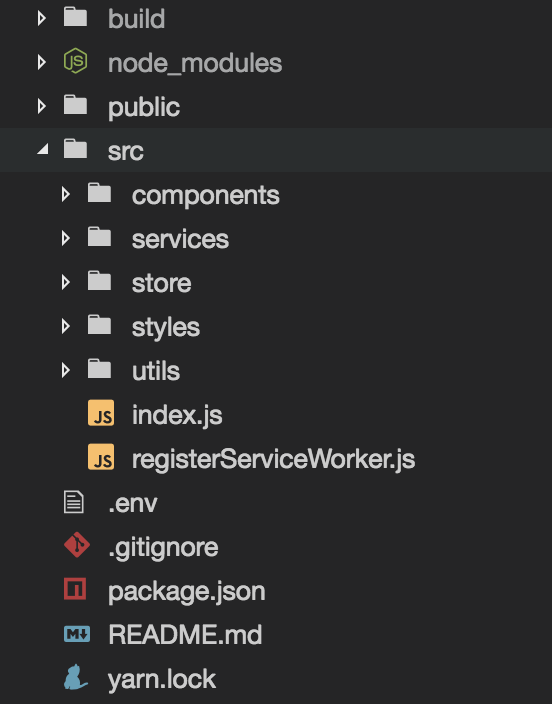
components: This folder will hold all of our React components (both container and presentational).services: Services allow you to connect to APIs (ex. using axios to call the HN API) or provide extended functionality to the application (ex. adding Markdown support).store: The store holds all of our logic for Redux and managing state.styles: Inside the styles folder, we declare variables, templates, and reusable style patterns that can be shared in components.utils: Helper functions that can be reused throughout the application.
There are 2 aspects about this folder structure worth noting:
- Our application only has 1 route which is the root
/. If we had multiple routes, I would also usereact-routerand create apagesfolder for page-level components.
- I don’t use a separate
containersfolder for connecting to Redux. I’ve found this adds unnecessary complexity and confusion because developers will import from the incorrect location (containerswhen they wantedcomponentsor vice versa). Having a single source of truth for imports works better in a practical context in my experience.
Since we are using styled-components, we can delete the index.css file and the App.css files. Now we can add some boilerplate base styling.Inside the src/styles folder create files named globals.js and palette.js.
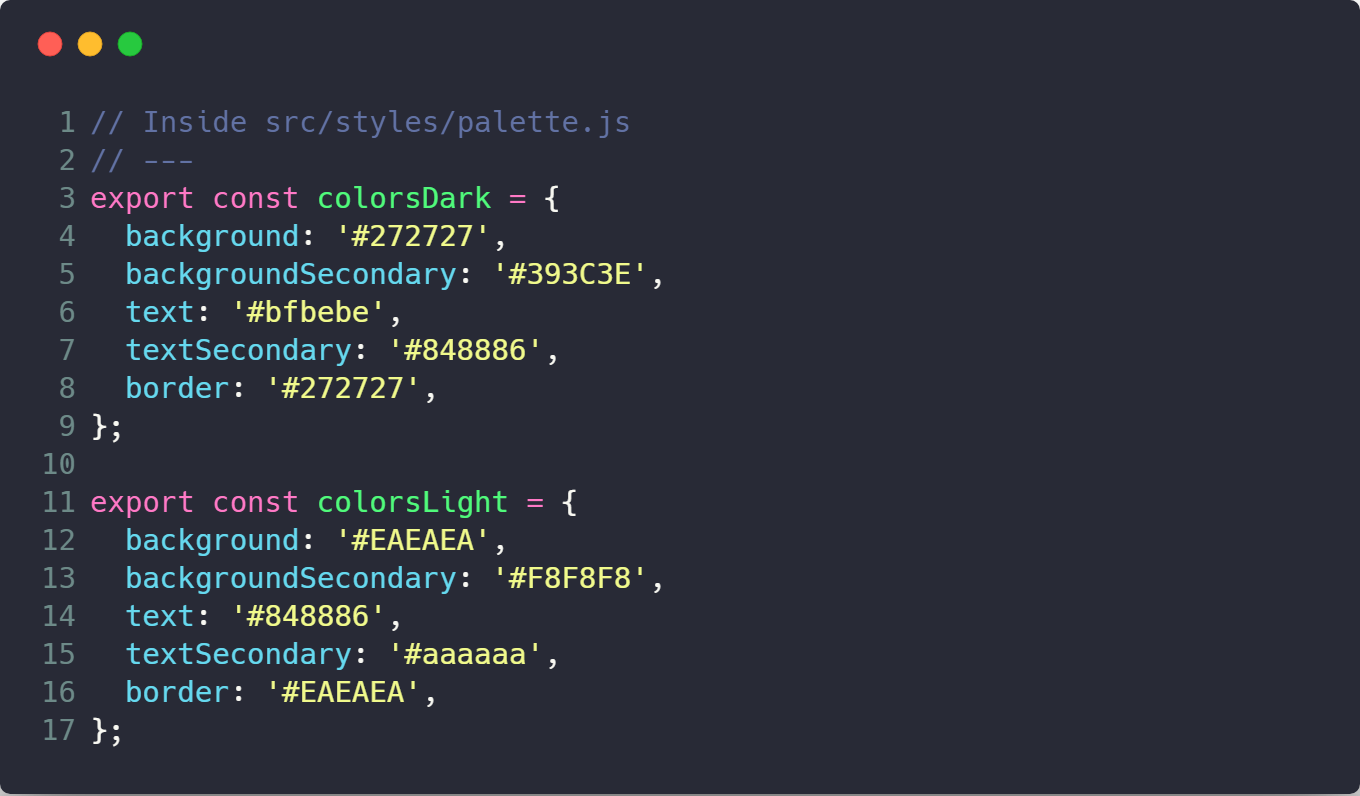
Palette will contain the groupings of colors we will use in the application and create the themes for our UI. Add the following code to src/styles/palette.js.
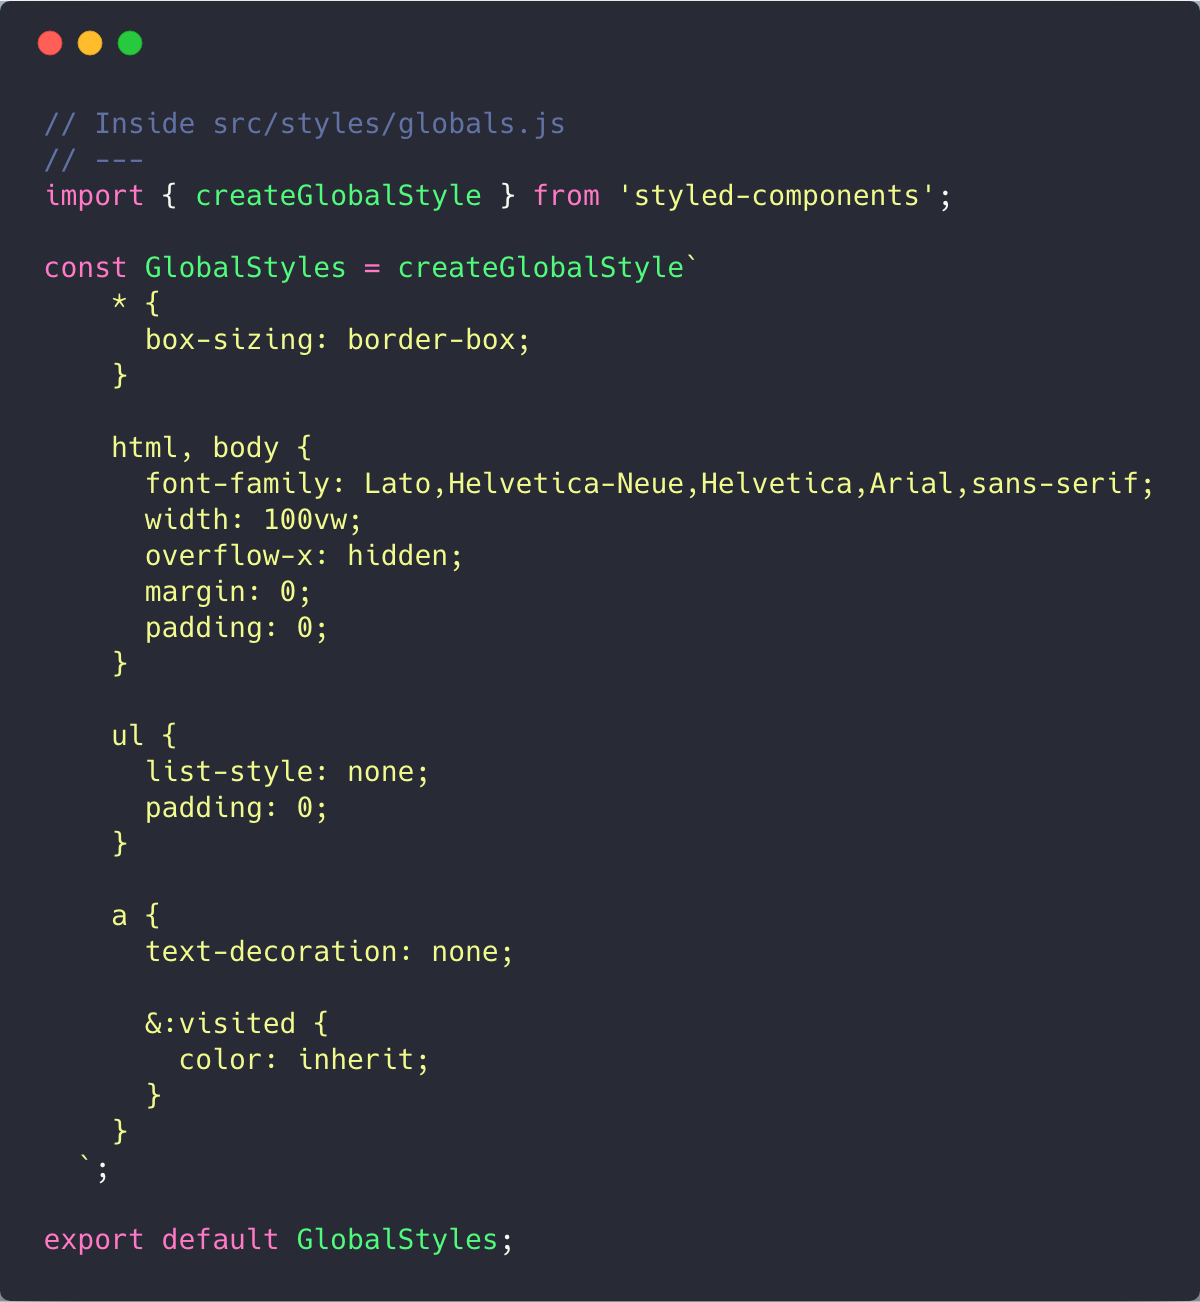
The globals.js is used to generate our default base styling shared across the app. The createGlobalStyle method from styled-components should be used sparingly, but it is useful for app-level styles. It generates a new component with globally applied styling.
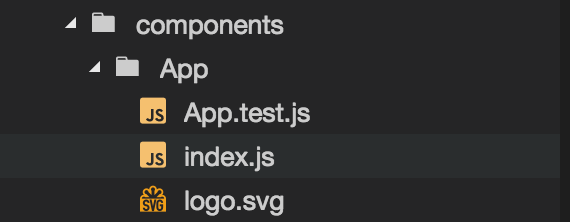
Inside the components folder create an App folder. Move the default CRA files to this location and rename App.js to index.js. This allows us to import components/App.
Now, open src/index.js (the root file of your project) and update the content to use our new folder structure.
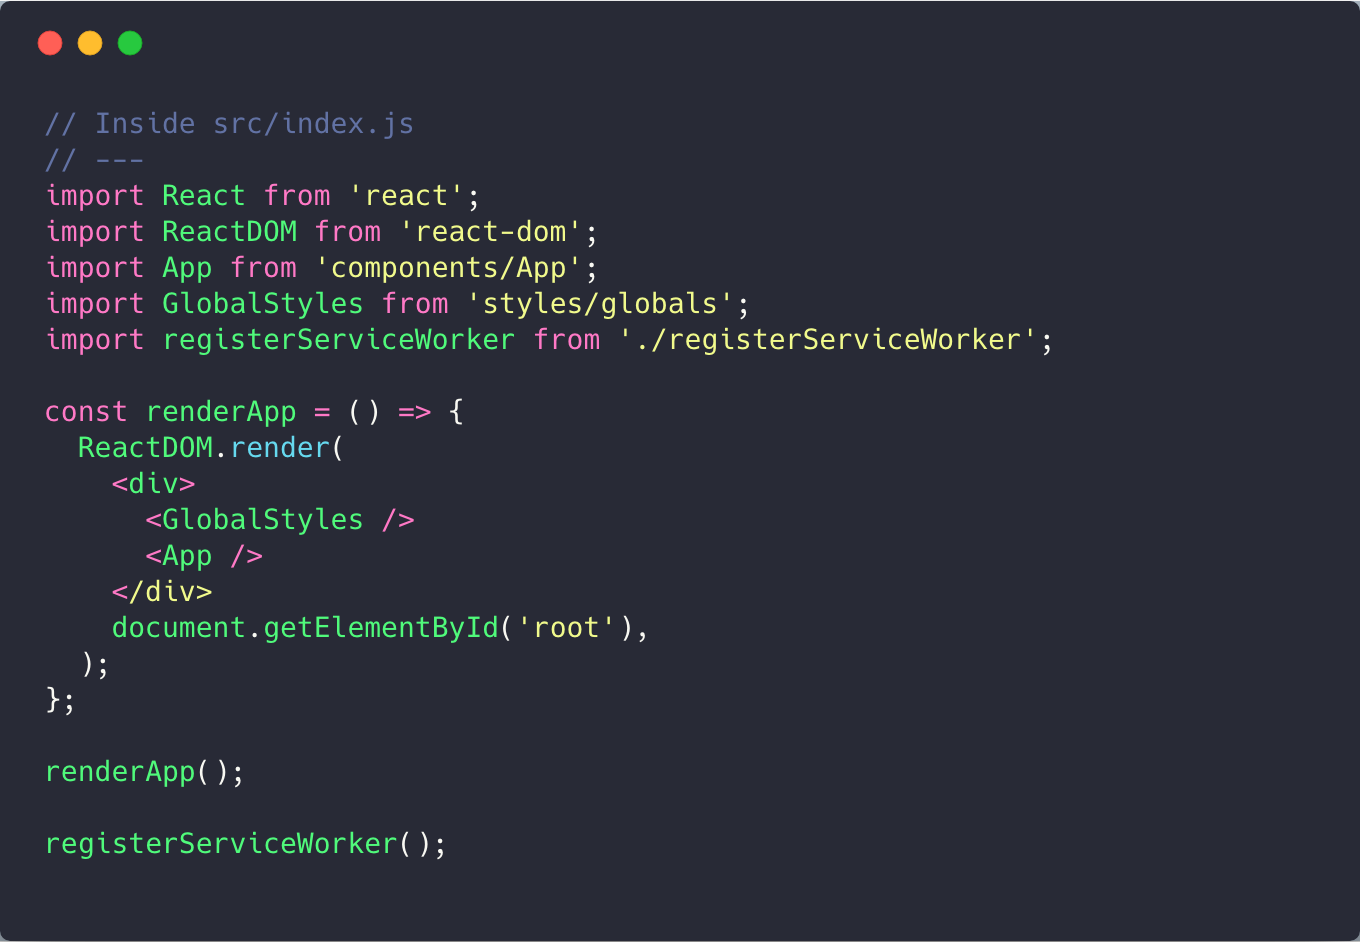
Notice that since we set the NODE_PATH previously, we can import App using components/App and GlobalStyles using styles/globals. In styled-components v4, this is now a component which we will include in parallel to our <App /> component to apply styles globally.
Now we’re ready to start our development environment with our core structure in place. Run the following command to start the app, and you should see it on http://localhost:3000.. Not much to look at yet, but we’ll get there :)
yarn start
Adding Redux to Your React App
Inside our src/store folder, create an index.js file a reducer.js file, and a middleware.js file. Let’s also initialize an app feature to manage state for the app.

From my experience, in production Redux is more manageable if you group by feature as opposed to functionality, similar to the Ducks approach. In the “grouping by functionality” approach where all actions, reducers, etc live in a separate folder, it can be increasingly difficult to navigate between files when the number grows in production. When you group by feature, you always have the files you need in a single, compact location.
Inside the index.js we’ll create a configureStore function which is how we will initialize Redux in the application.
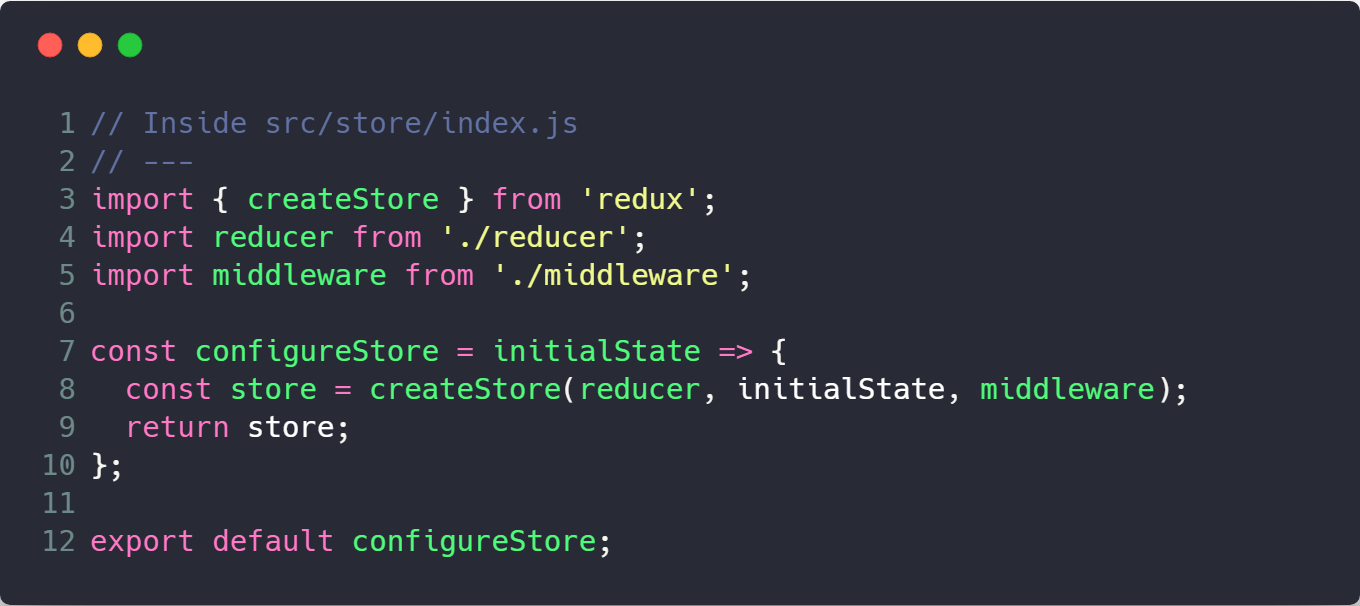
We use createStore from Redux which builds the initial store. We import reducer from our root reducer file, and we import the middleware from our middleware configuration file. The initialState will be supplied at runtime and passed to our function. In production, we could be managing complex functionality such as SSR or passing data from the server on the initial load, and this allows us to handle that gracefully and abstract it away from the store creation.
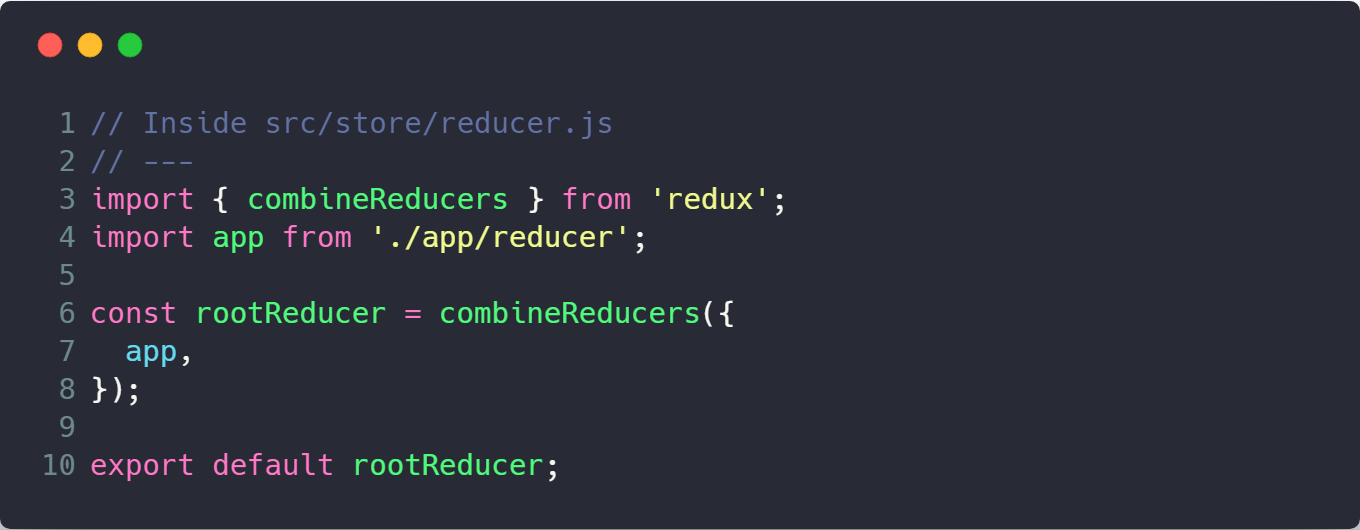
Inside the reducer.js file, create the root reducer using combineReducers. This function combines all your reducer functions to build a single state tree.
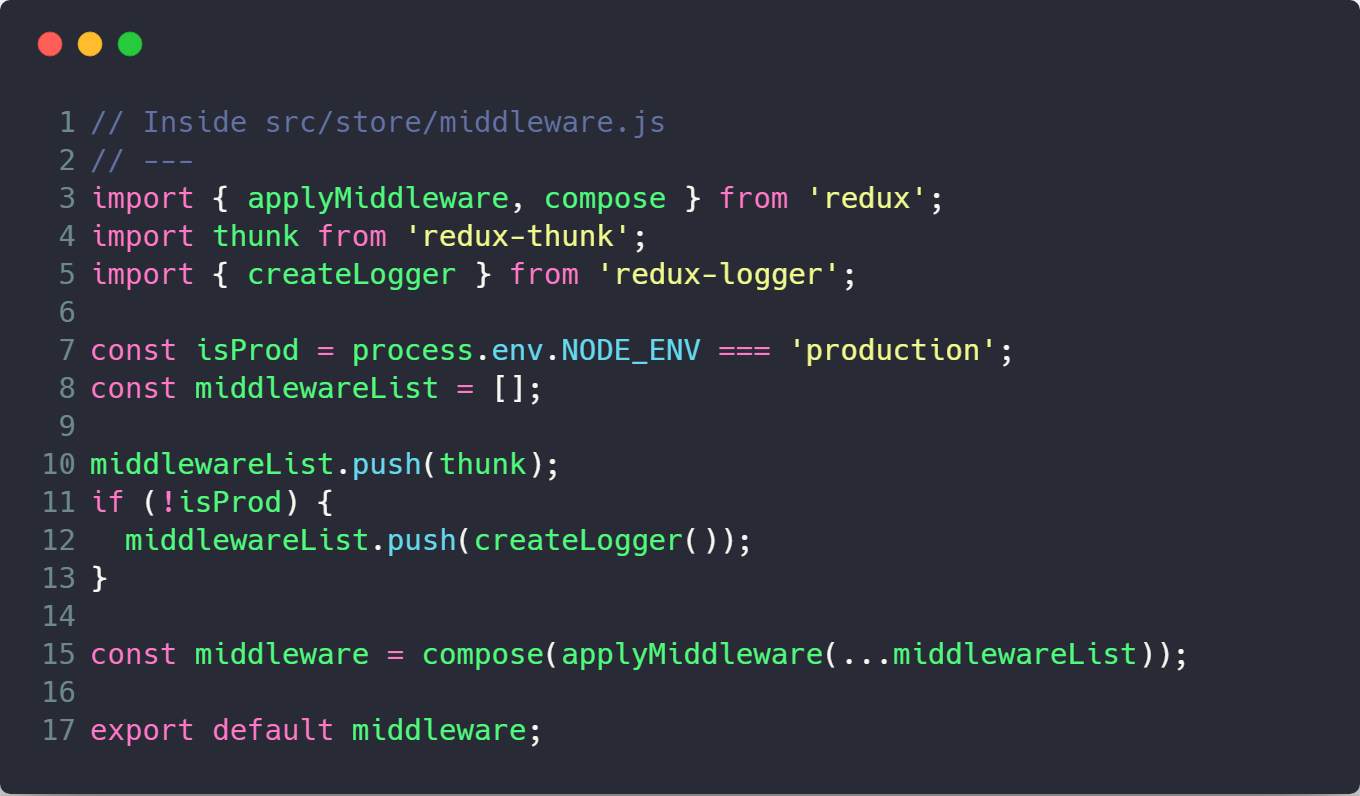
Next we can create our middleware in the middleware.js file. A middleware is a function that the dispatched action must pass through every time. It is used to extend the functionality of Redux. Add the following code to the file.
We will also build our first reducer. Inside src/store/app, create reducer.js and actions.js files. We’ll add functionality to toggle between day mode and night mode, so let’s create an action to manage this feature. Inside src/stre/app/actions.js, add the following code.

We create an actionTypes object to hold our action-type constants. These will be used in the reducer to match the type with the state change. We also create an actions object which holds the functions we will dispatch from our application to create state changes. Every action will have a type and a payload.
Finally, we can create our reducer.
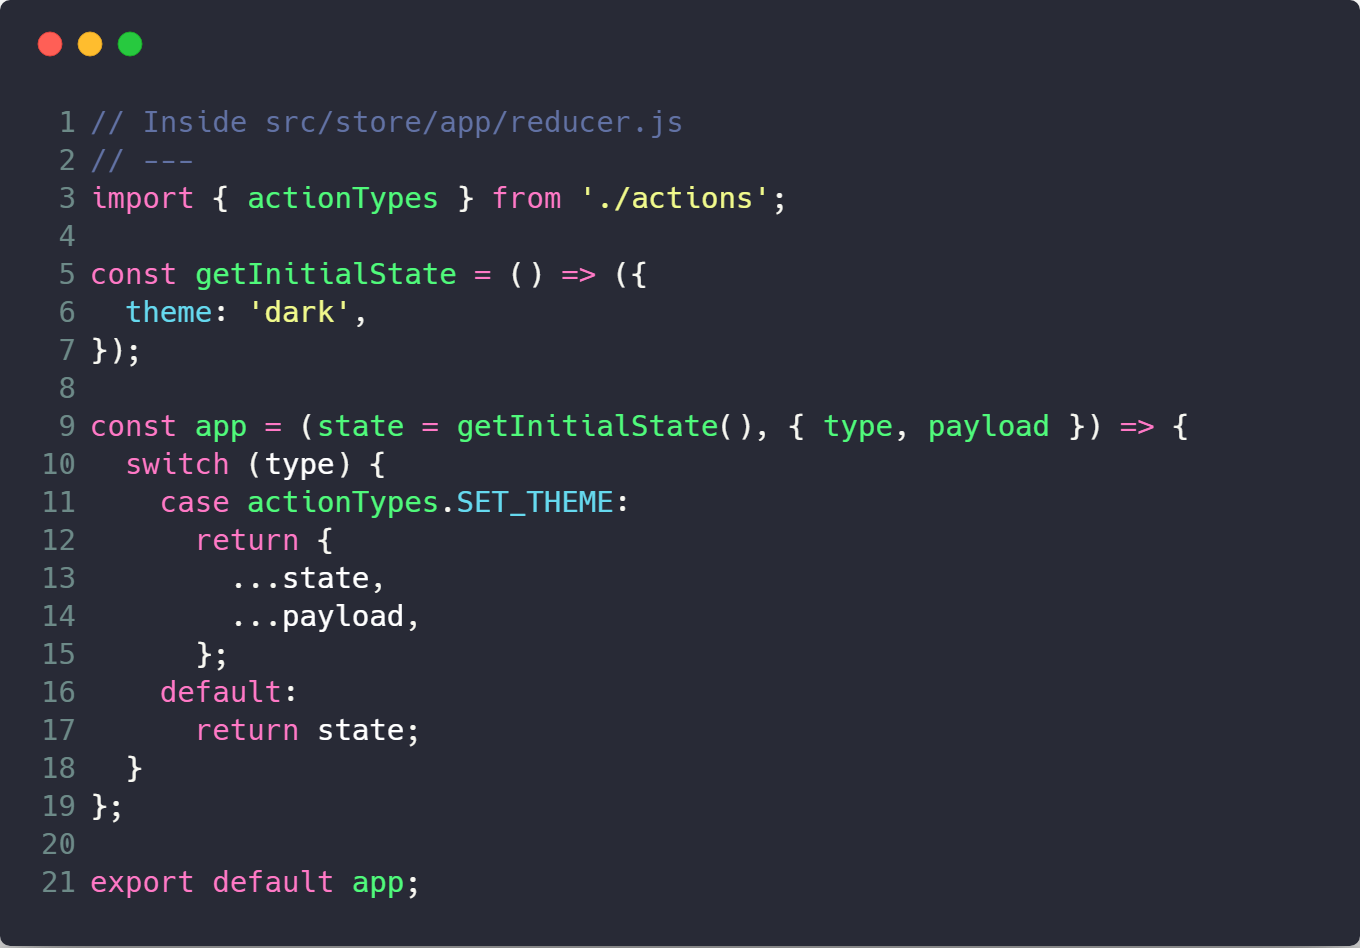
When we dispatch a SET_THEME action, it will update the theme value of the state to the value inside the payload. The payload will be an object that has the form { theme: 'value' }. When we spread … the payload object, the keys of the state will be replace the keys in ...state that match — in this case theme.
For the brevity of this article, if you need a further understanding of the fundamentals of Redux, check out this free video by the creator of Redux, Dan Abramov.
Return to the src/index.js, and now we can update it to connect our app to Redux. Add an import for Provider and update your render method to look like the following.
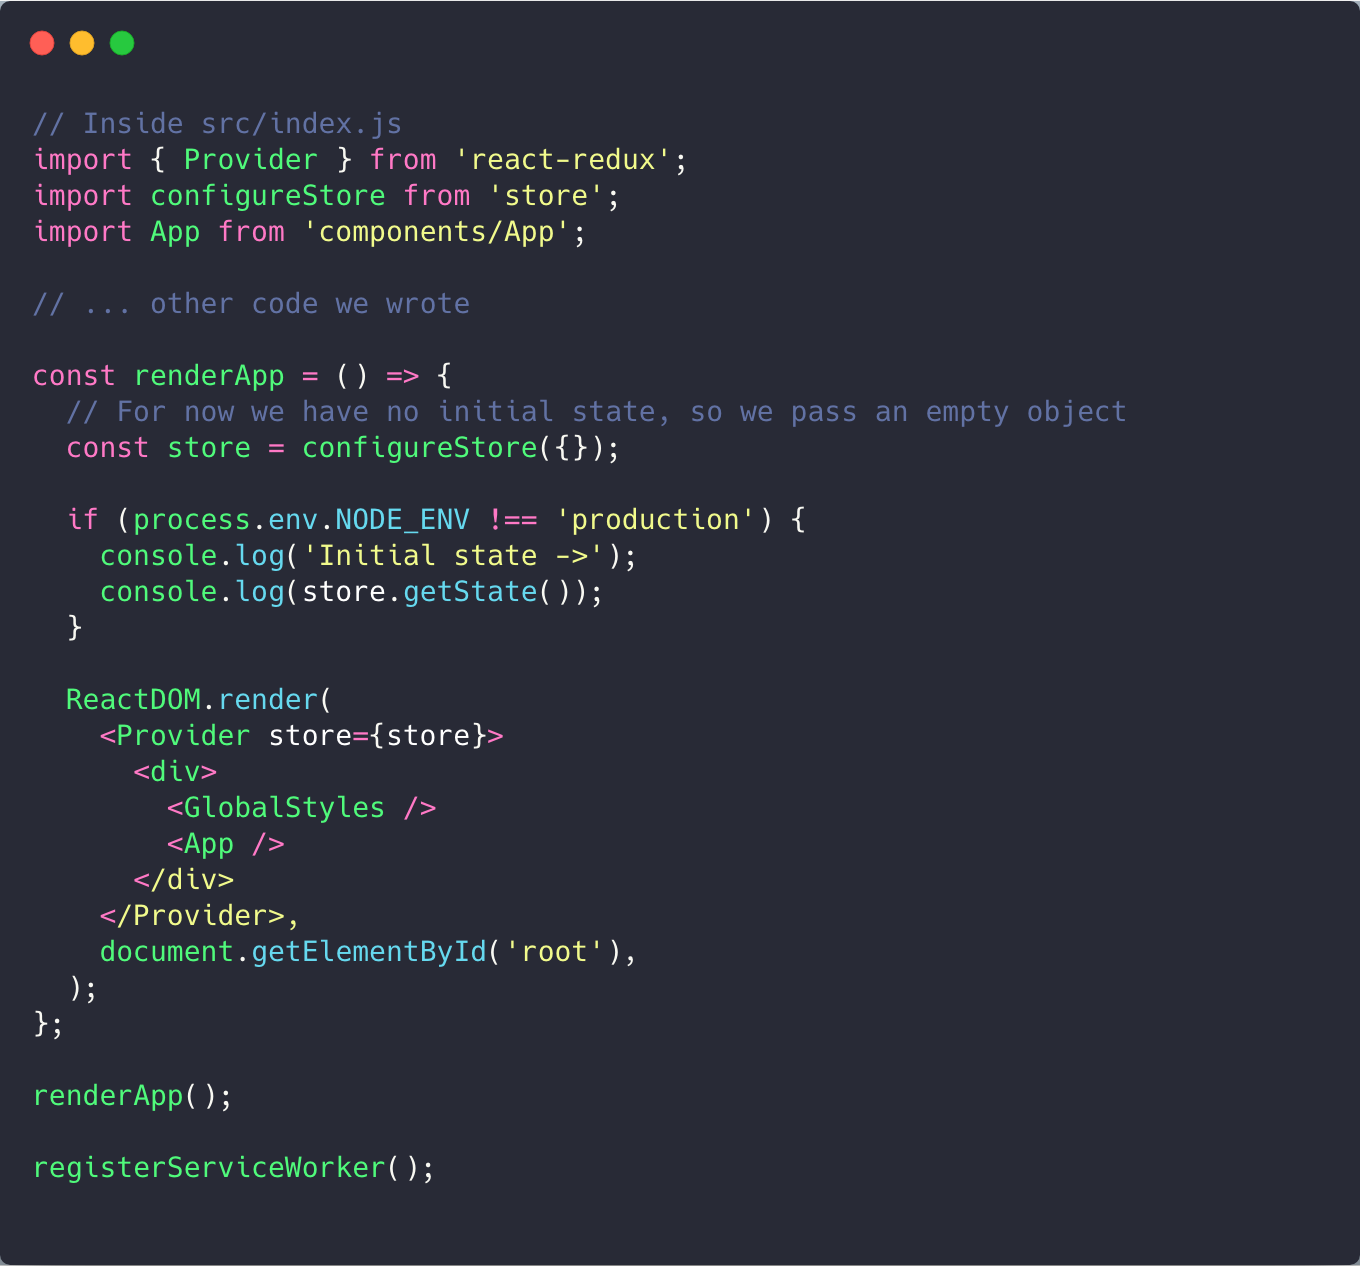
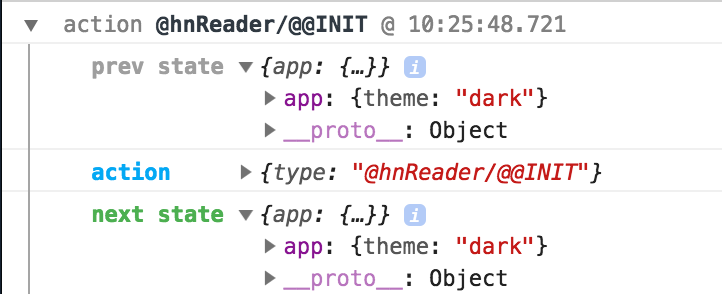
And that should be all you need to get Redux integrated with the app! Return to http://localhost:3000, and you should see the following when you open your Chrome console.
Build the UI with React and Styled Components
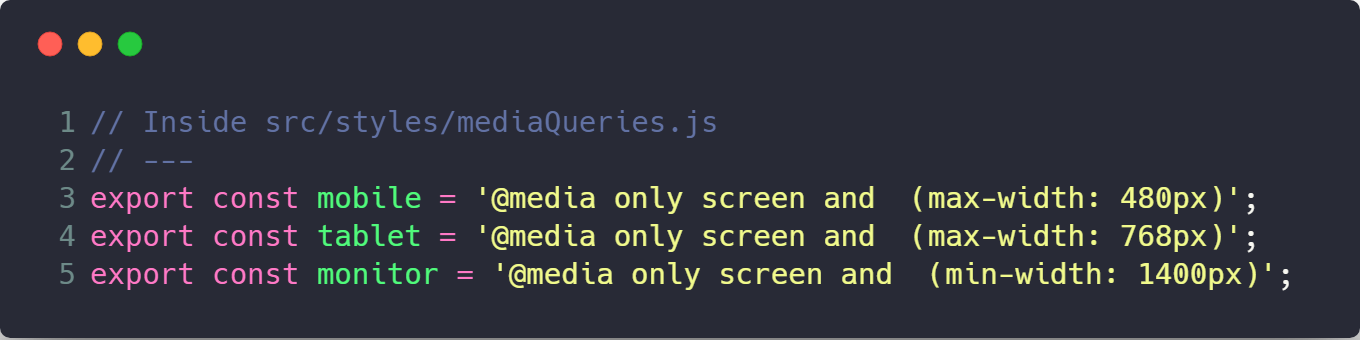
Now that Redux is initialized, we can begin working on our UI. First, let’s declare some more style constants that we’ll use inside our components. In this case, we’ll create a mediaQueries file to hold constants to make it easy to add mobile responsiveness to our app. Create a src/styles/mediaQueries.js file, and the following code to each.
Return to our src/components/App folder. Inside index.js, we update the content to be the following.
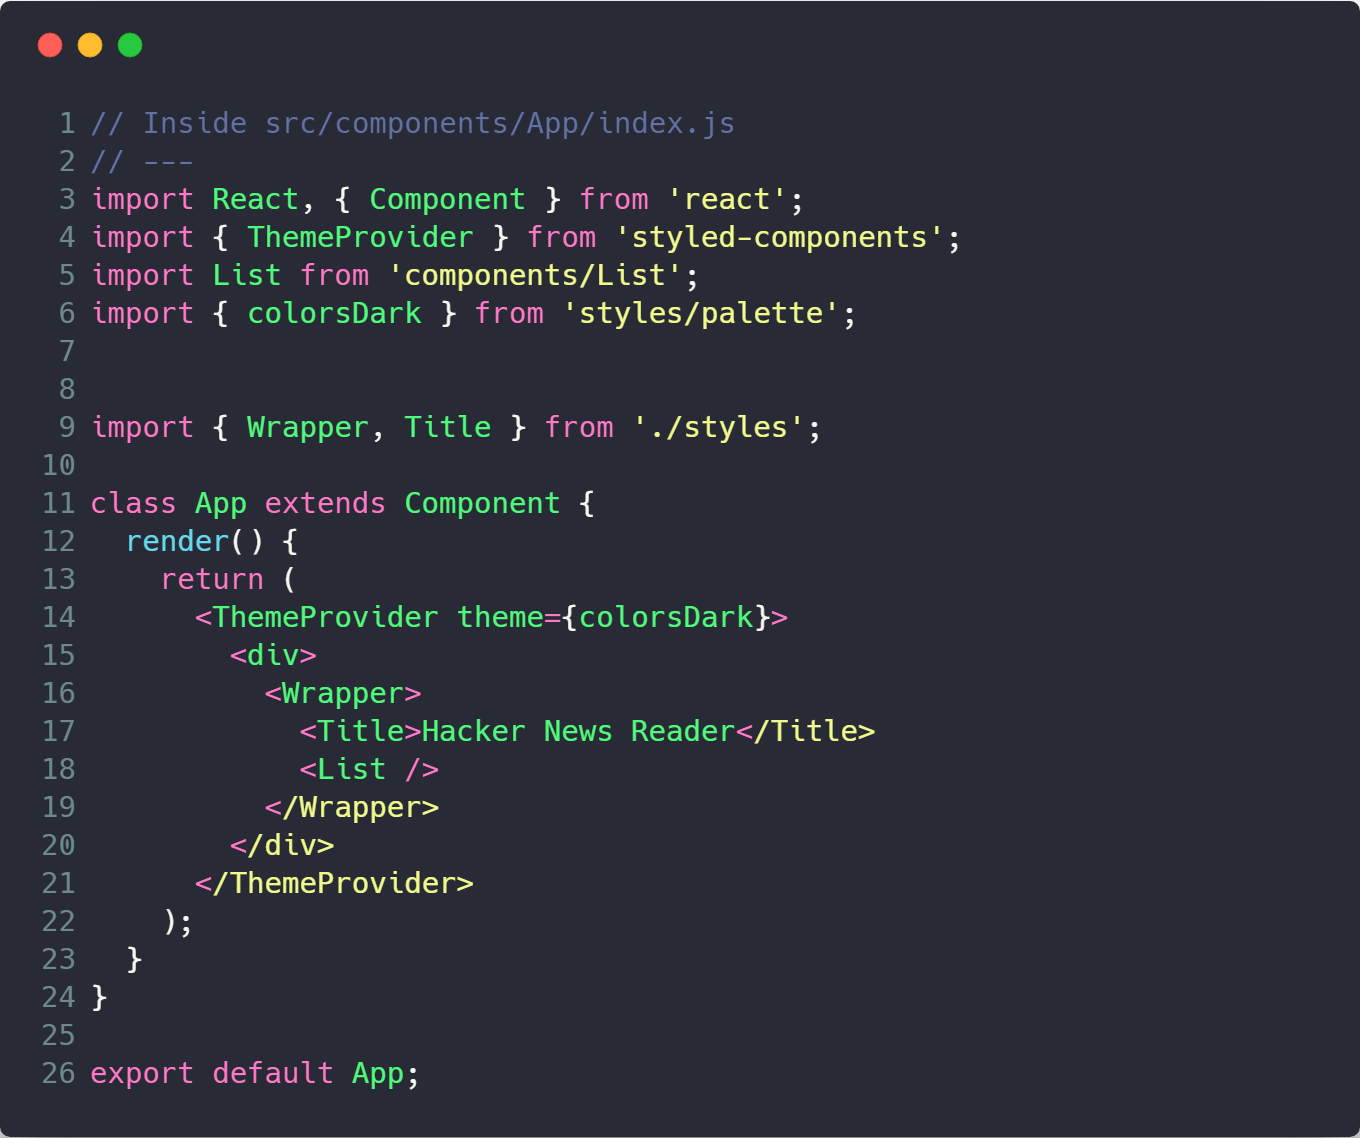
We use the ThemeProvider component from styled-components. This provides functionality enables us to pass a “theme” as a prop to all styled components that we build. We’ll initialize it here as the colorsDark object.
App contains components that we have not built yet, so let’s do that now. First, let’s build our styled components. Create a file styles.js inside theApp folder and add the following code.

This creates div for the page which we call Wrapper and an h1 for the page as the component Title. The styled-components syntax creates a component using the HTML element that you specify after after the styled object. You use a string to define the CSS properties of that component.
Notice on line 20, we use our theme prop. A function containing props as an argument is injected by styled-components into the styling string allowing us to extract properties or add logic to construct styles, abstracting this away from the component that uses them.
Next we create our List component which will contain our Hacker News stories. Create a src/components/List folder and add an index.js and styles.js files. Inside index.js add the following.
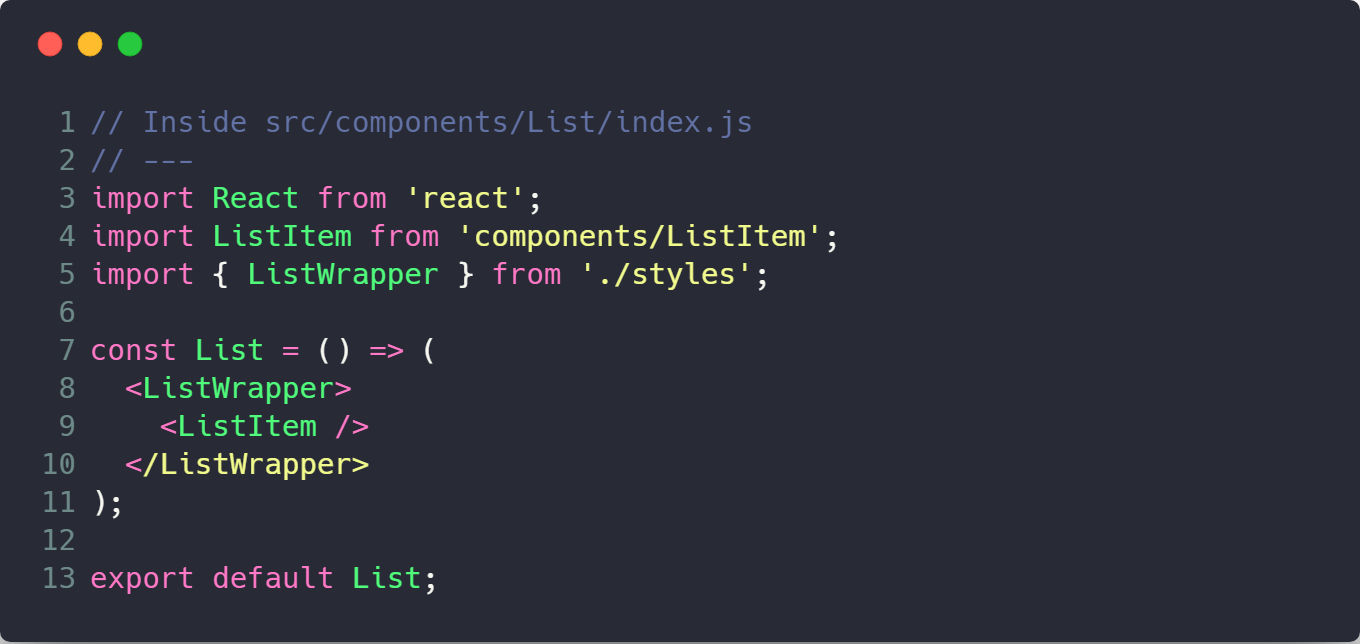
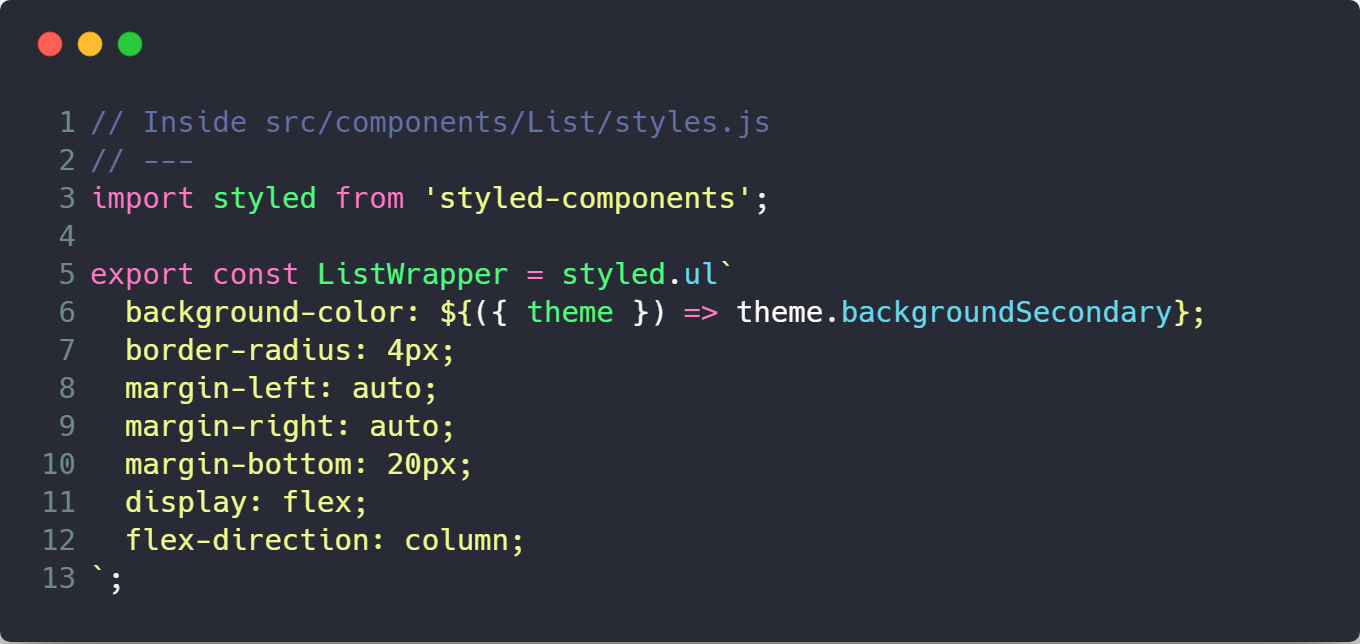
And inside the styles.js we create the ListWrapper. We set the background-color using the theme prop which we get from the ThemeProvider component.
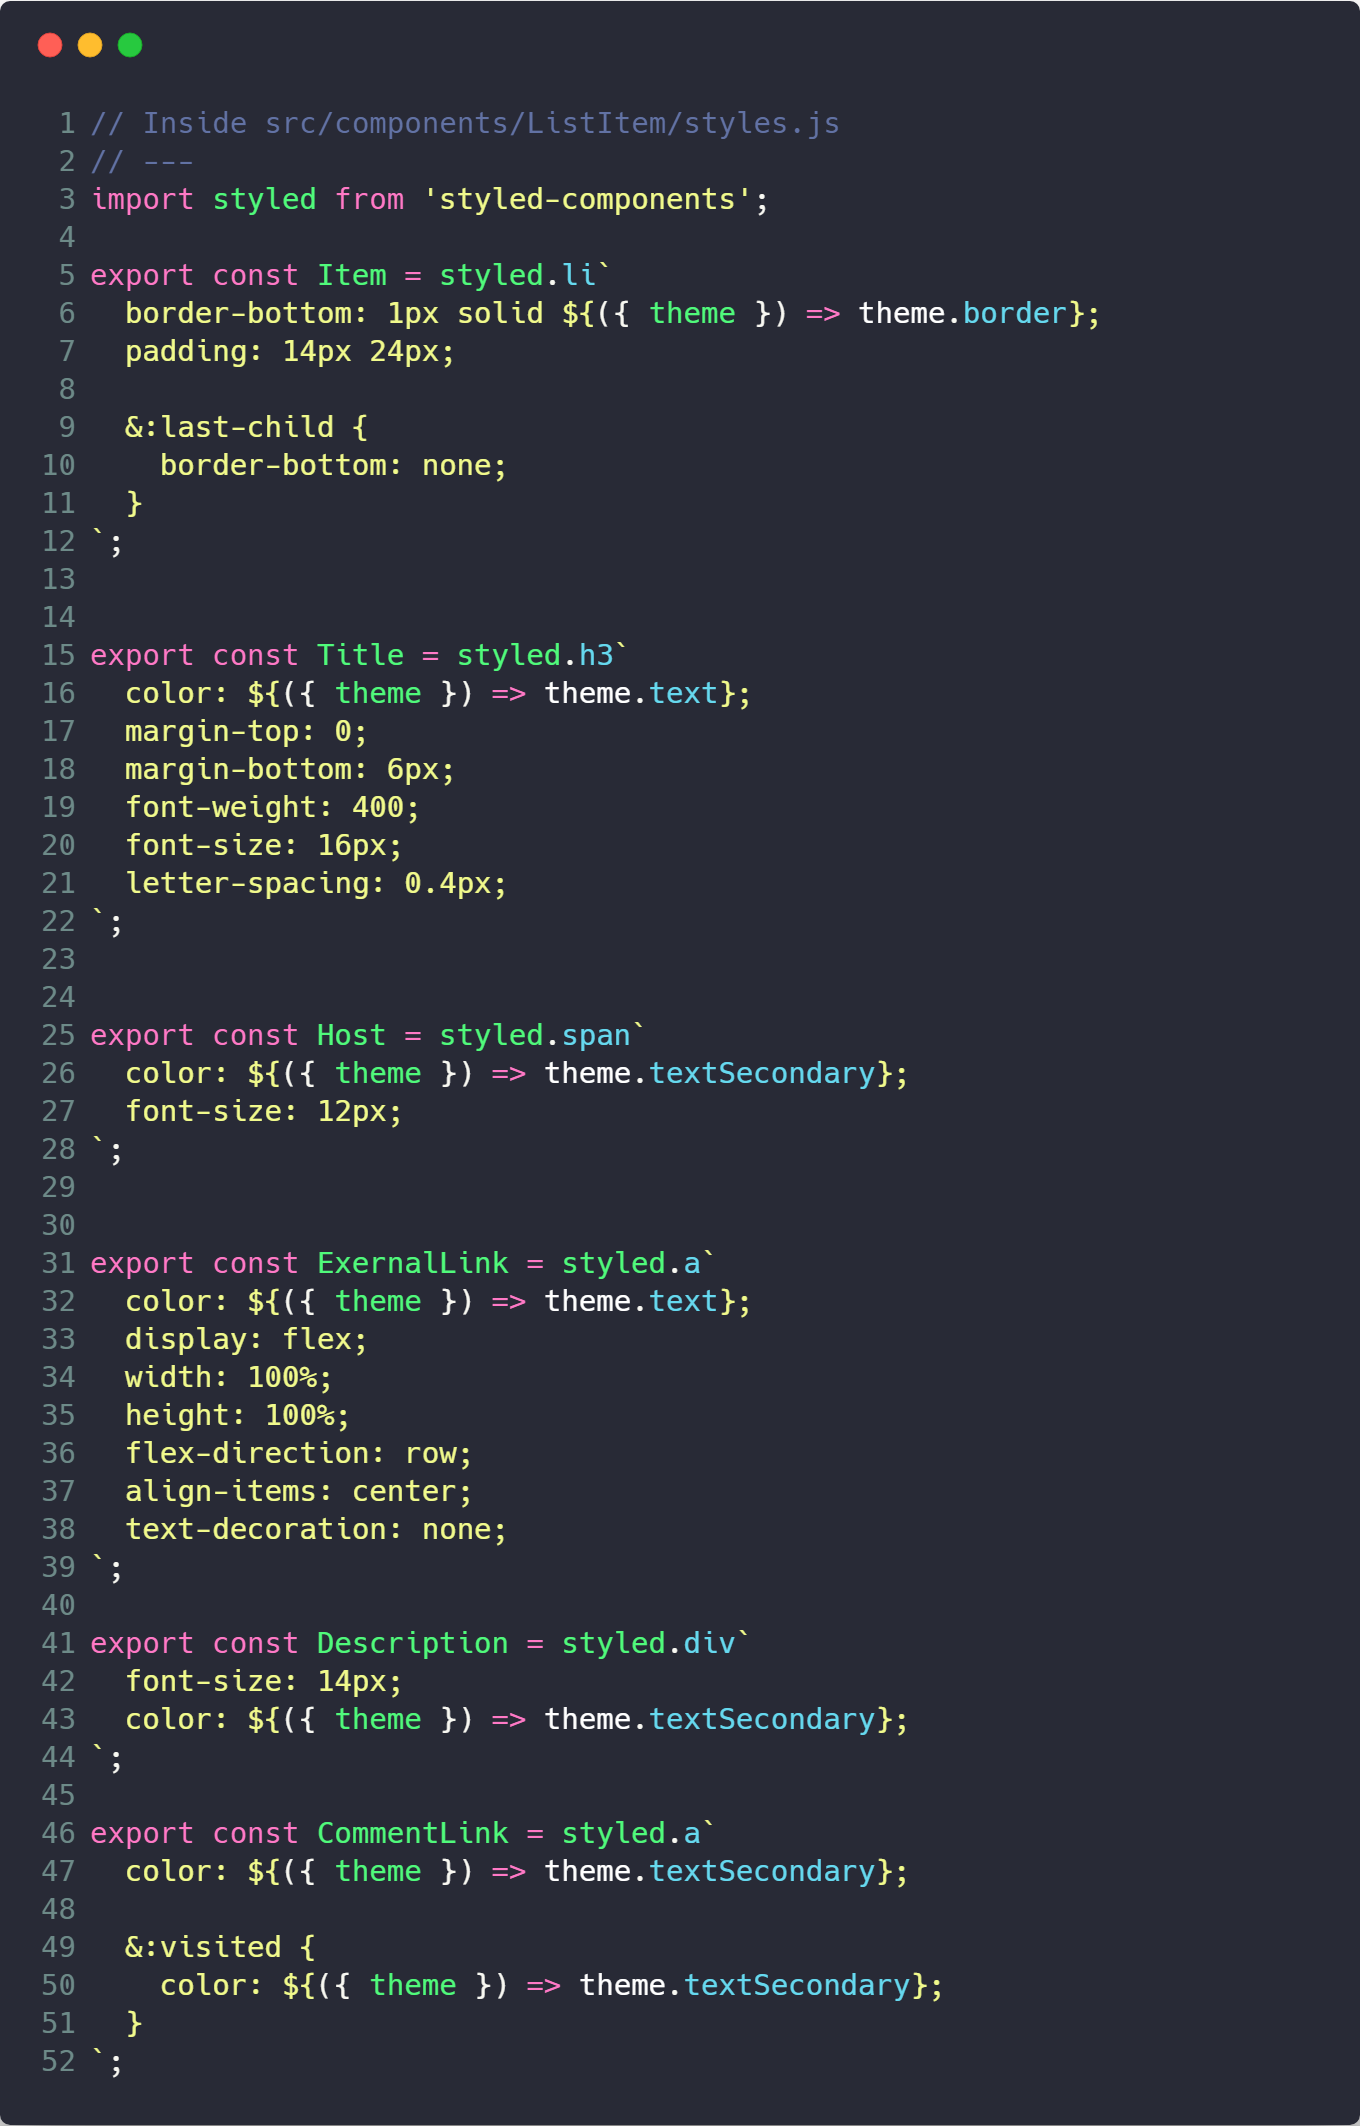
Finally, we create our ListItem component which will display the individual stories. Create a src/components/ListItem folder and an index.js and style.js files.
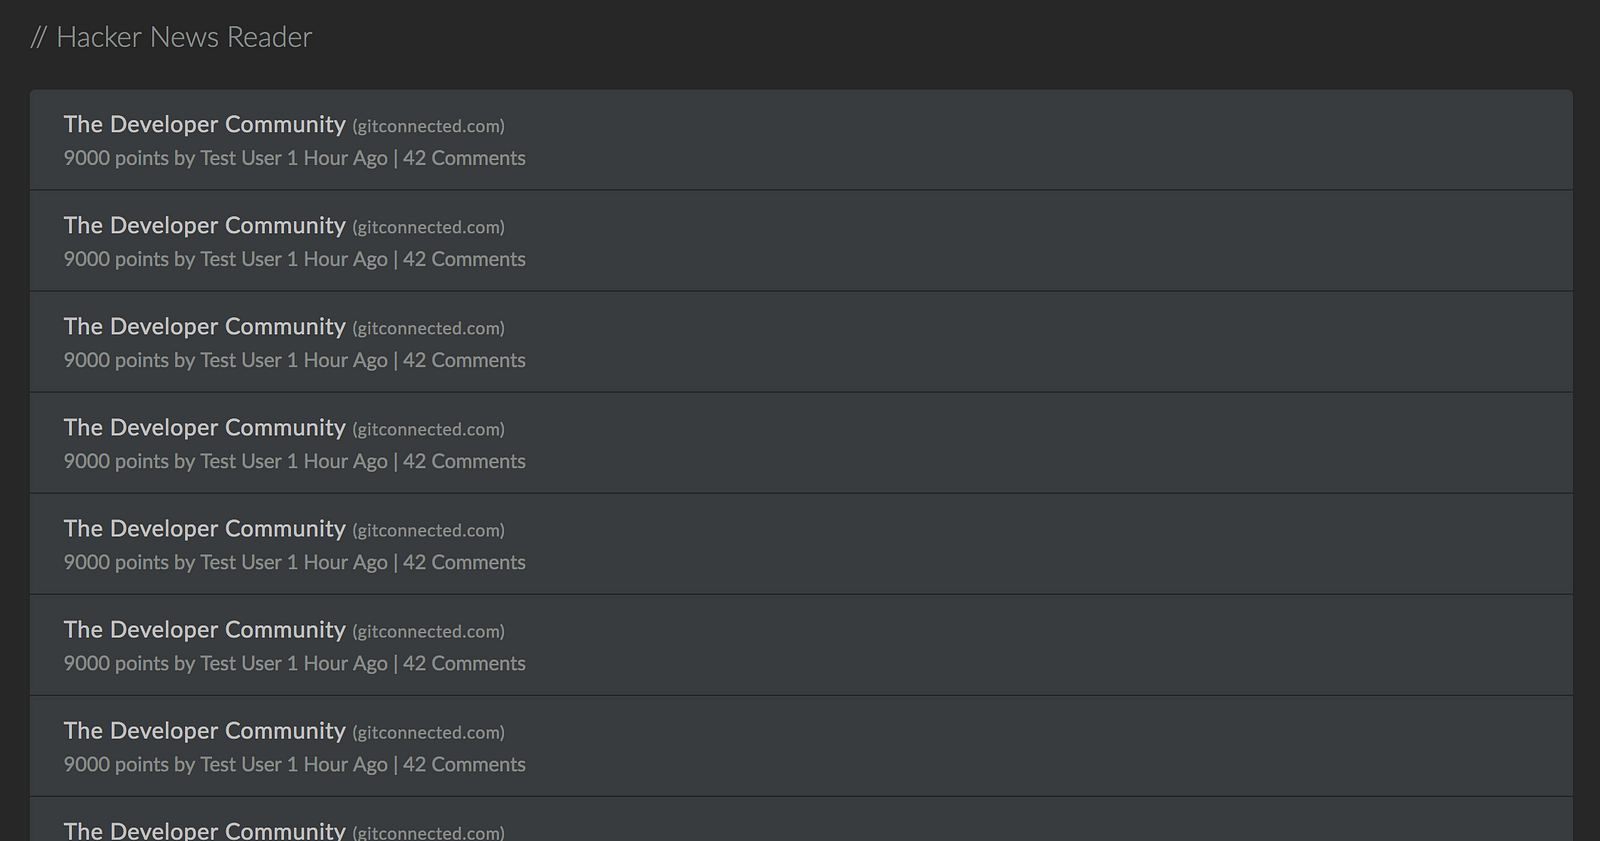
We want our UI to mimic that of Hacker News. For now, we will use fake data inside our ListItem to mock this. Add the following code to the index.js file.
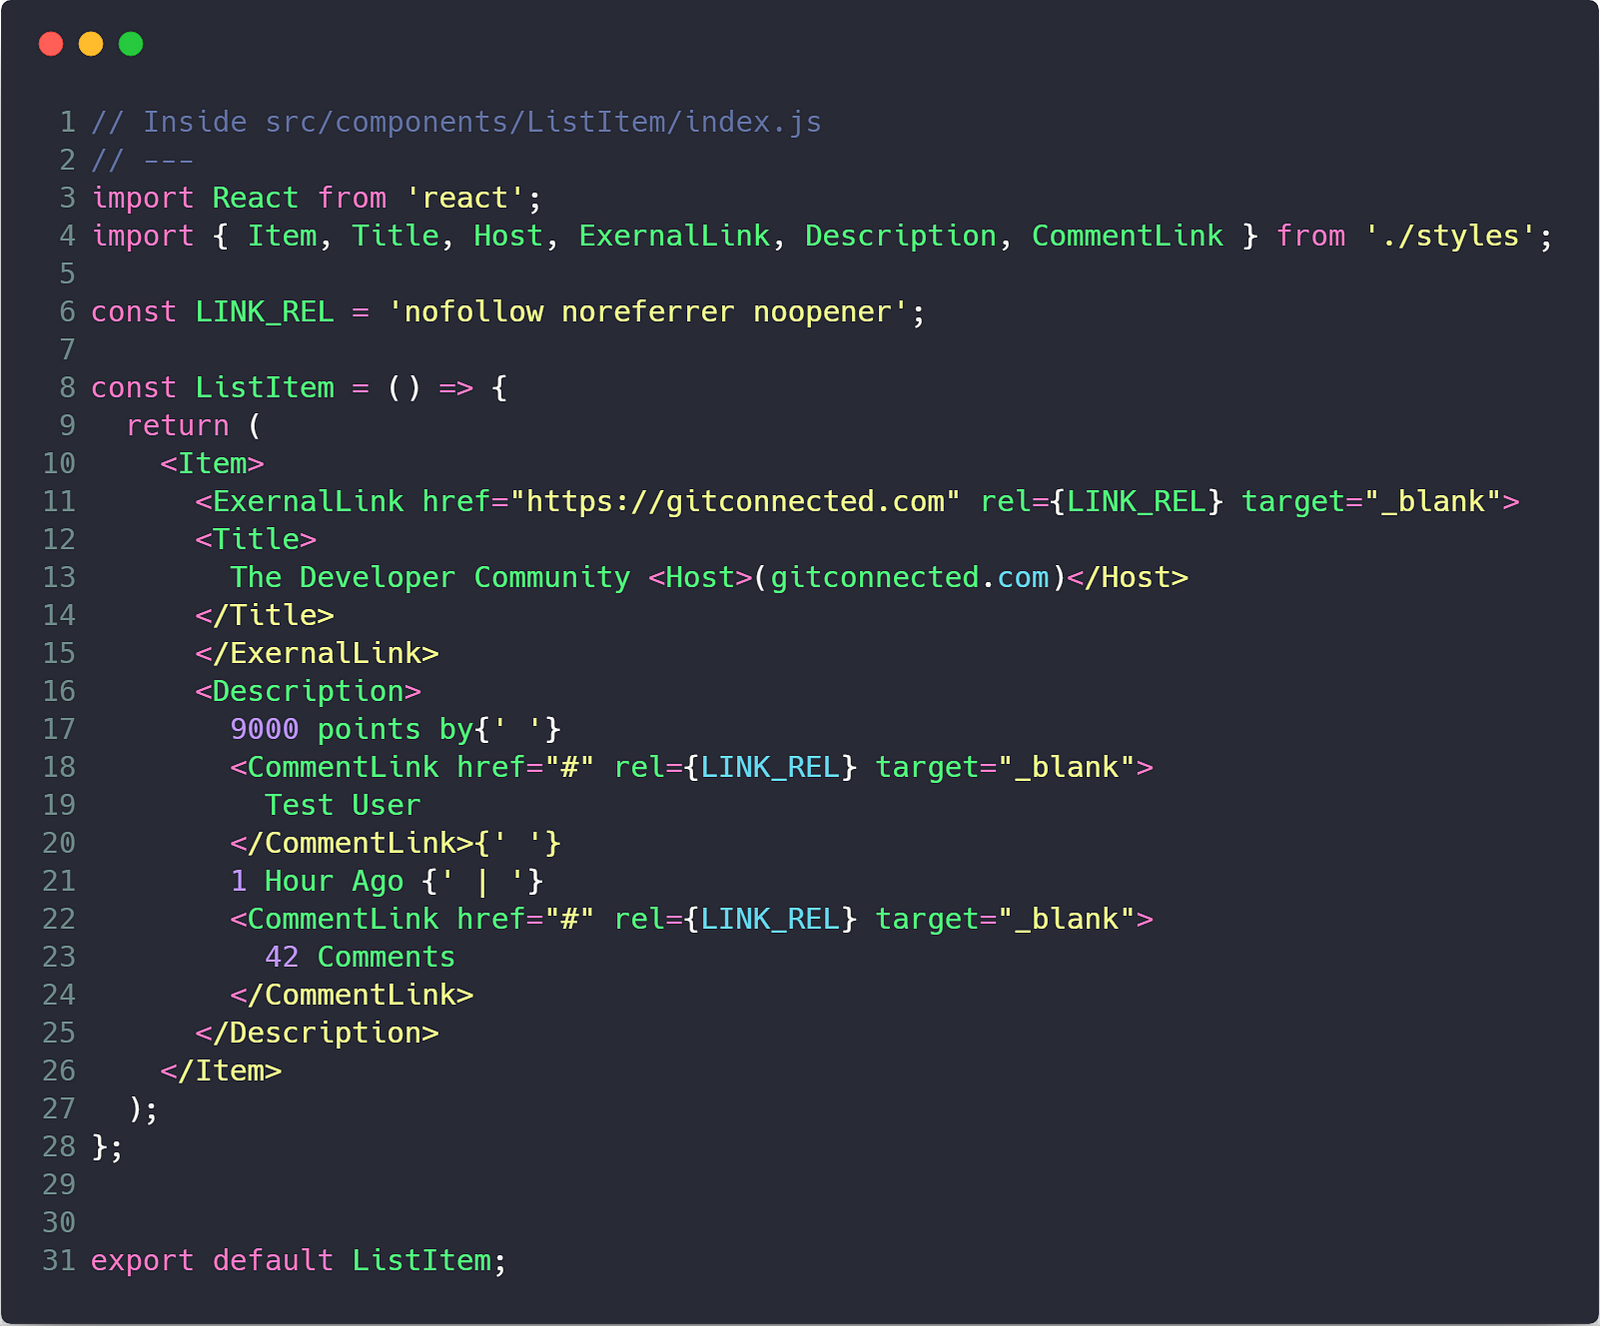
Each story has a title, author, score, time of post, source URL, and comment count. We initialize these to test values so we can see how it looks in our UI. The rel="nofollow noreferrer noopener" is added for security reasons.
In the styles.js file, add the following code.
And that should be the basic UI components that we need! Return to your browser and you should have a single item feed with fake data.

Making API Calls with Redux and Axios
It’s time to add real data to our app. We will call the Hacker News API using theaxios request library. Calling an API will introduce a “side effect” to our application which means that it will modify the state from a source outside of our local environment.
API calls are considered side effects because they will introduce oustide data to our state. Other examples of side effects are interacting with localStorage in the browser, tracking user analytics, connecting to a web socket, and many more. There multiple libraries to manage side effects in Redux apps, from the simple redux-thunk to the more complex redux-saga. However, they all serve the same purpose — allow Redux to interact with the outside world. redux-thunk is one of the simplest libraries to use in that it allows you dispatch a JavaScript function in addition to action objects. This is the exact functionality we need to use axios by utilizing a function that manages the returned promise from the API call.
Inside our src/services folder, create an Api.js file and hackerNewsApi.js. The axios library is incredibly powerful and extensible. The Api.js will contain the configuration to make axios requests easy. We won’t copy the entire file here, but you can get the content from source code which uses sensible defaults for basic API requests that we need in this project.
Inside the src/services/hackerNewsApi.js file, we will define the functions to make requests to the Hacker News API. The documenation shows that will use the /v0/topstories endpoint to get a list of IDs, and the /v0/items/<id> endpoint to get the data for each individual story.
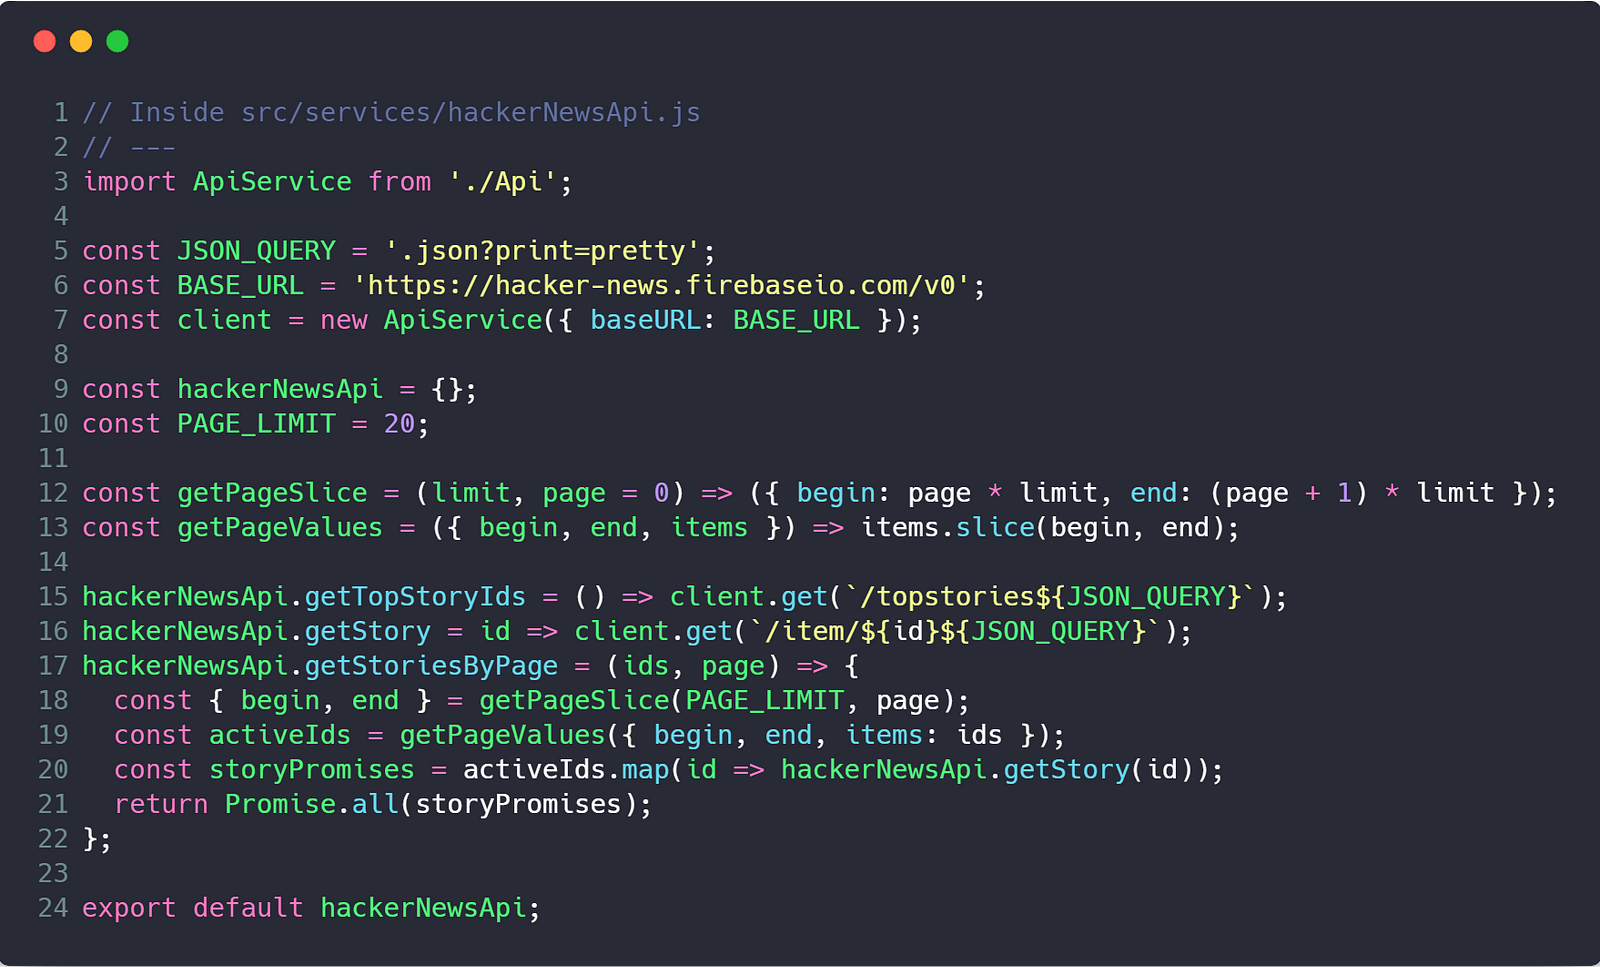
The /v0/topstories endpoint returns all top story IDs which is ~400–500 items in the list. Since we fetch the data for each story individually, it would kill performance to then fetch all 500 individual items immediately. To solve this, we only fetch 20 stories at a time. We .slice() the story ID array based on the current page and return that section of story items. Since we call the the /v0/item/<id> for each story ID, we use a Promise.all to condense the response promises into a single array resolving to one .then() and preserving the ranking form the order of the story IDs.
To manage the state of the stories inside our application, we will create a story reducer. Create a src/store/story folder and inside it add a reducer.js file and an actions.js file. Inside the actions.js file, add the following code.
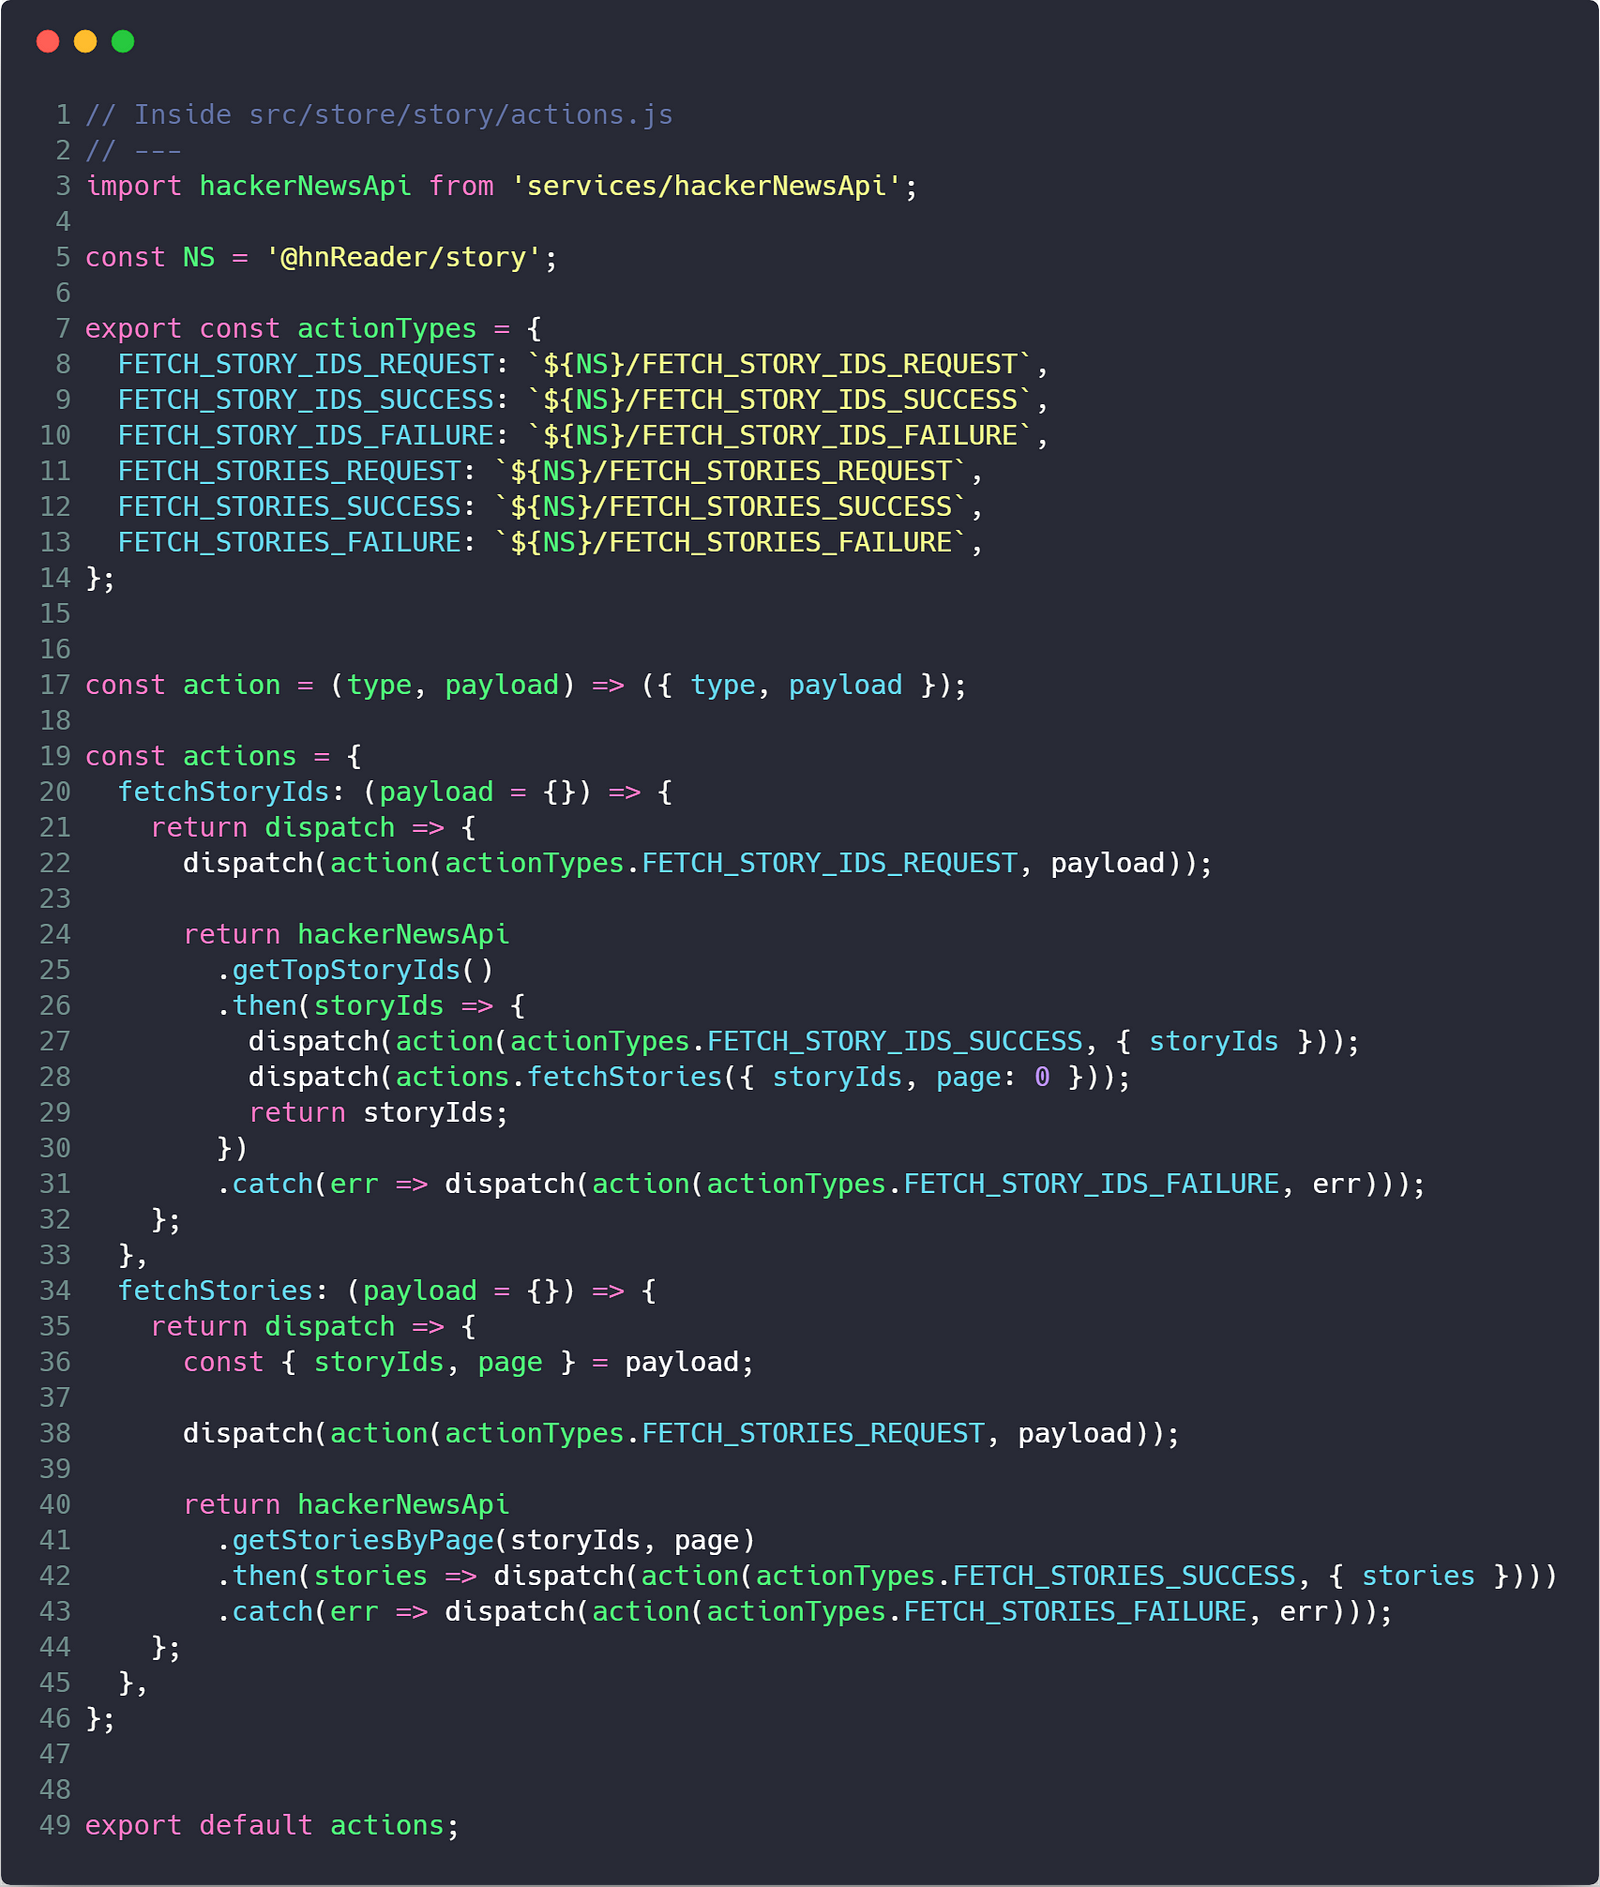
We create actionTypes for the request, success, and failure states for our story ID and story items API calls.
Our actions object will contain thunk functions which manages the request. By dispatching functions instead an action object, we are able to dispatch actions at different points during the request lifecycle.
The function getTopStoryIds will make the API call to get the full list of stories. In the success callback of getTopStoryIds, we dispatch the fetchStories action to retrieve the first page of results for story items.
When our API calls successfully return, we dispatch the success action, allowing us to update our Redux store with the new data.
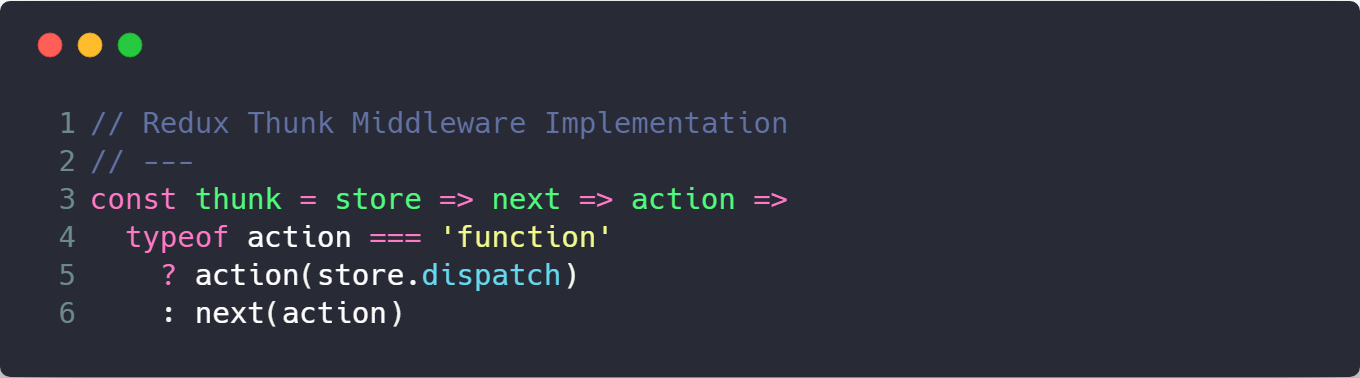
A basic implementation of the thunk package only uses a few lines of code. It requires knowledge of Redux middleware to understand it fully, but from the code we can see that if our
actionis afunctioninstead of anobject, we execute that function and passdispatchas the argument.
Now we need to create the reducer to store the data in our Redux state. Inside the src/store/story/reducer.js file, add the following.

For the FETCH_STORY_IDS_SUCCESS action type, we spread the current state and payload. The only key/value inside the payload is storyIds, which will then update the state to the new value.
For the FETCH_STORIES_SUCCESS action type, we add the new stories to the previously created list of stories which will keep them in order as we fetch more pages. In addition, we increment the page and set the isFetching state to false.
Now that we are managing the state of our stories in Redux, we can display this data using our components.
Connect the React App to the Redux Store
By using the react-redux bindings, we are able to connect our components to the store and receive Redux state as props. Then any time there is an update to the store, the props will also change causing a re-render of our components which will update the UI.
We also pass functions as props to our components that dispatch actions. When we call these functions inside our component, it can trigger state changes in our Redux store.
Let’s see how we manage this in our application. Return to the src/components/App folder create an App.js file and copy and paste the content from the src/components/App/index.js to the new App.js file. Inside the index.js we will connect the App component to Redux. Add the following code to the index.js file.
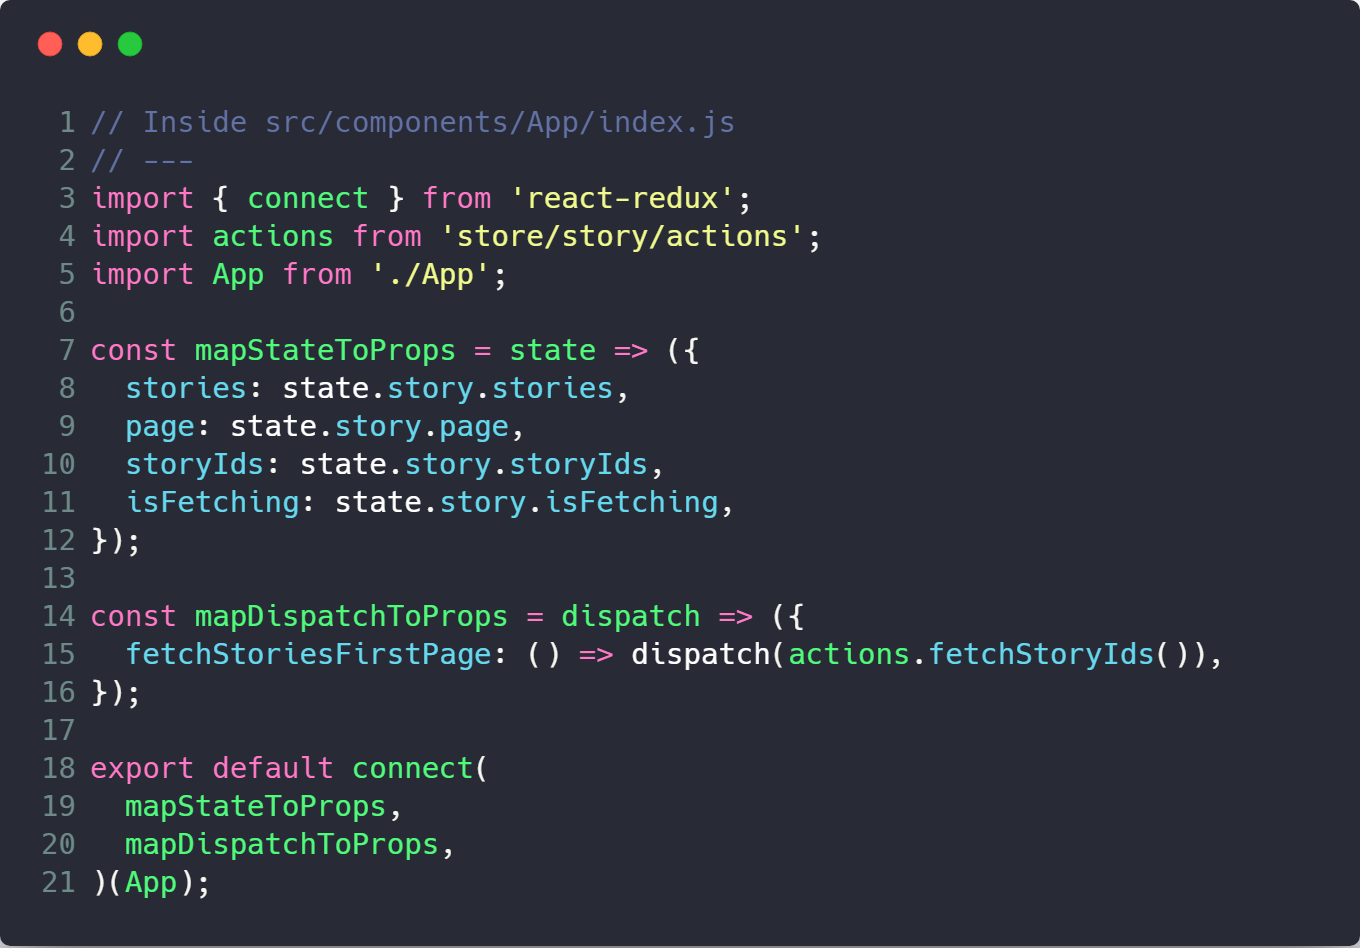
The mapStateToProps is a function that takes the Redux state as an argument and returns an object that is passed as props to the connected component. For App, we need the array of stories, the current page, the array of storyIds, and the isFetching indicator.
The mapDispatchToProps is a function that takes the dispatch function as an argument and returns an object of functions passed as props to our Component. We create a function fetchStoriesFirstPage that will disptach the action to fetch story IDs (and then fetches the first page of story items).
We utilize these props inside our App.js file. First we add a componentDidMount so that the stories are fetched once the component is in the DOM. This pass the stories prop to our List component

Inside src/components/List/index.js we map over the stories array and create an array of ListItem components. We set the key to the story ID and spread the story object …story — this pass all the values of the object as individual props to the component. The key prop is required for components mounted as an array so that React can be faster when updating them during a render.

If we look at the screen now, we should have 20 list items but still using the hard-coded data.
We need to update our ListItem to use the values from the stories. Also in Hacker News, it displays the time since the story was published and the domain of the source. We will install the [timeago.js](https://www.npmjs.com/package/timeago.js) and [url](https://www.npmjs.com/package/url) packages to help calculate these values since they are not passed directly from the API. Install them using the following command.
yarn add timeago.js urlWe will also write helper functions to build these values. Copy and the files from the src/utils folder in the source code.
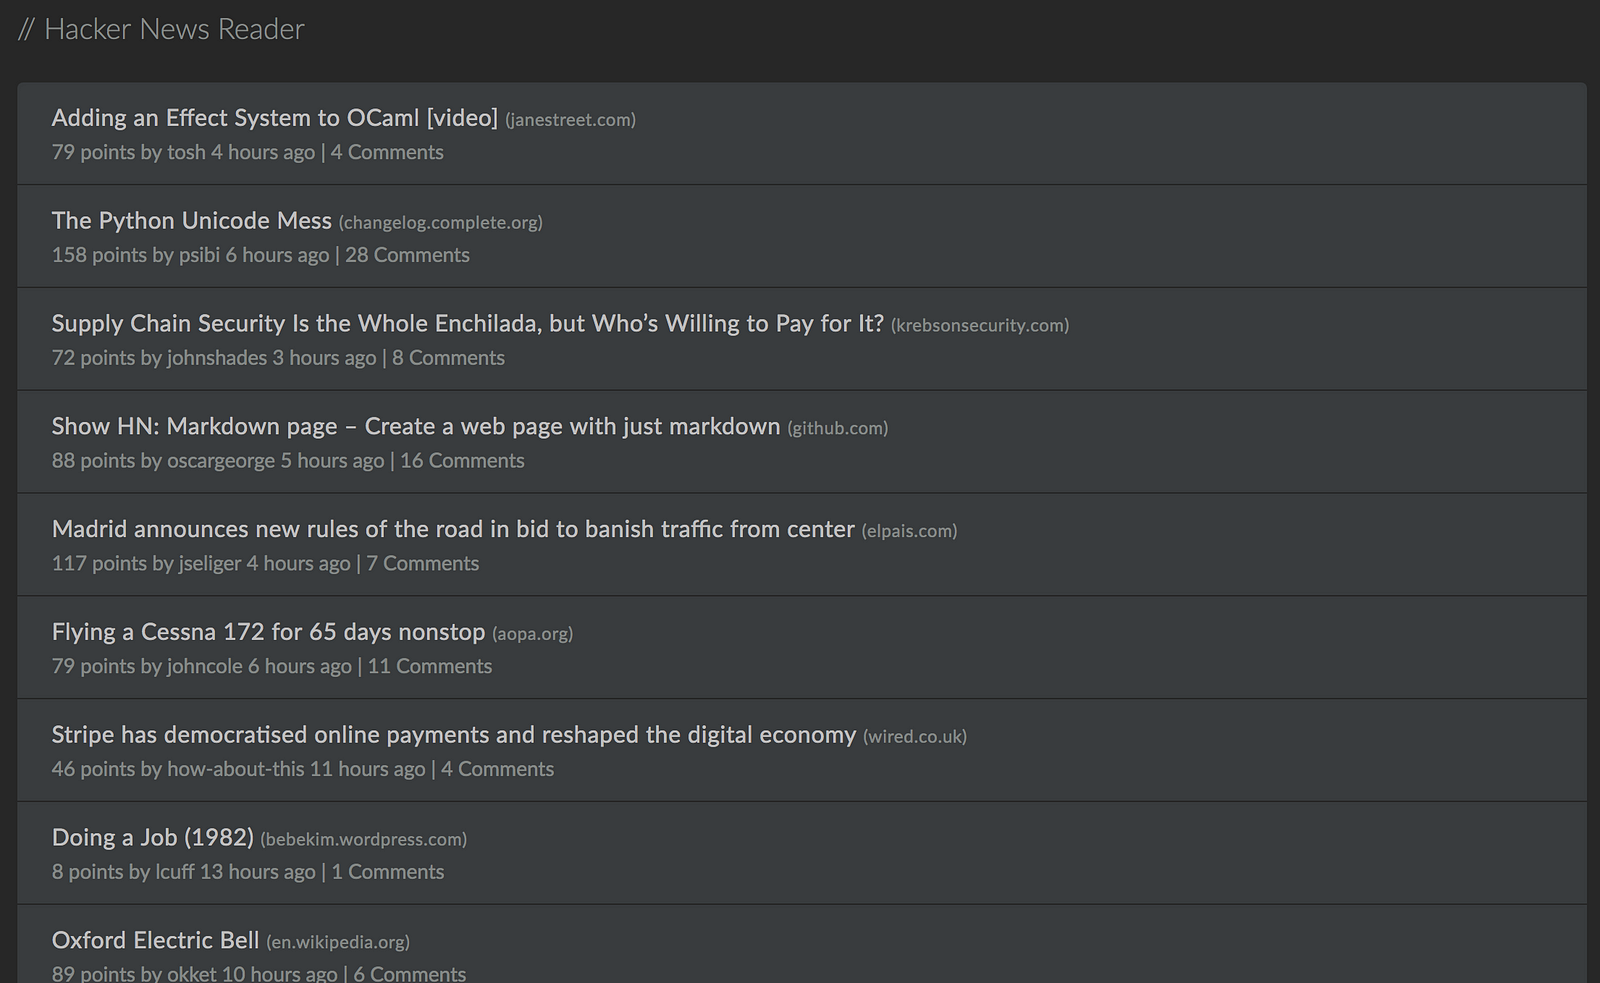
Now we can update our the src/components/ListItem/index.js file to the following.
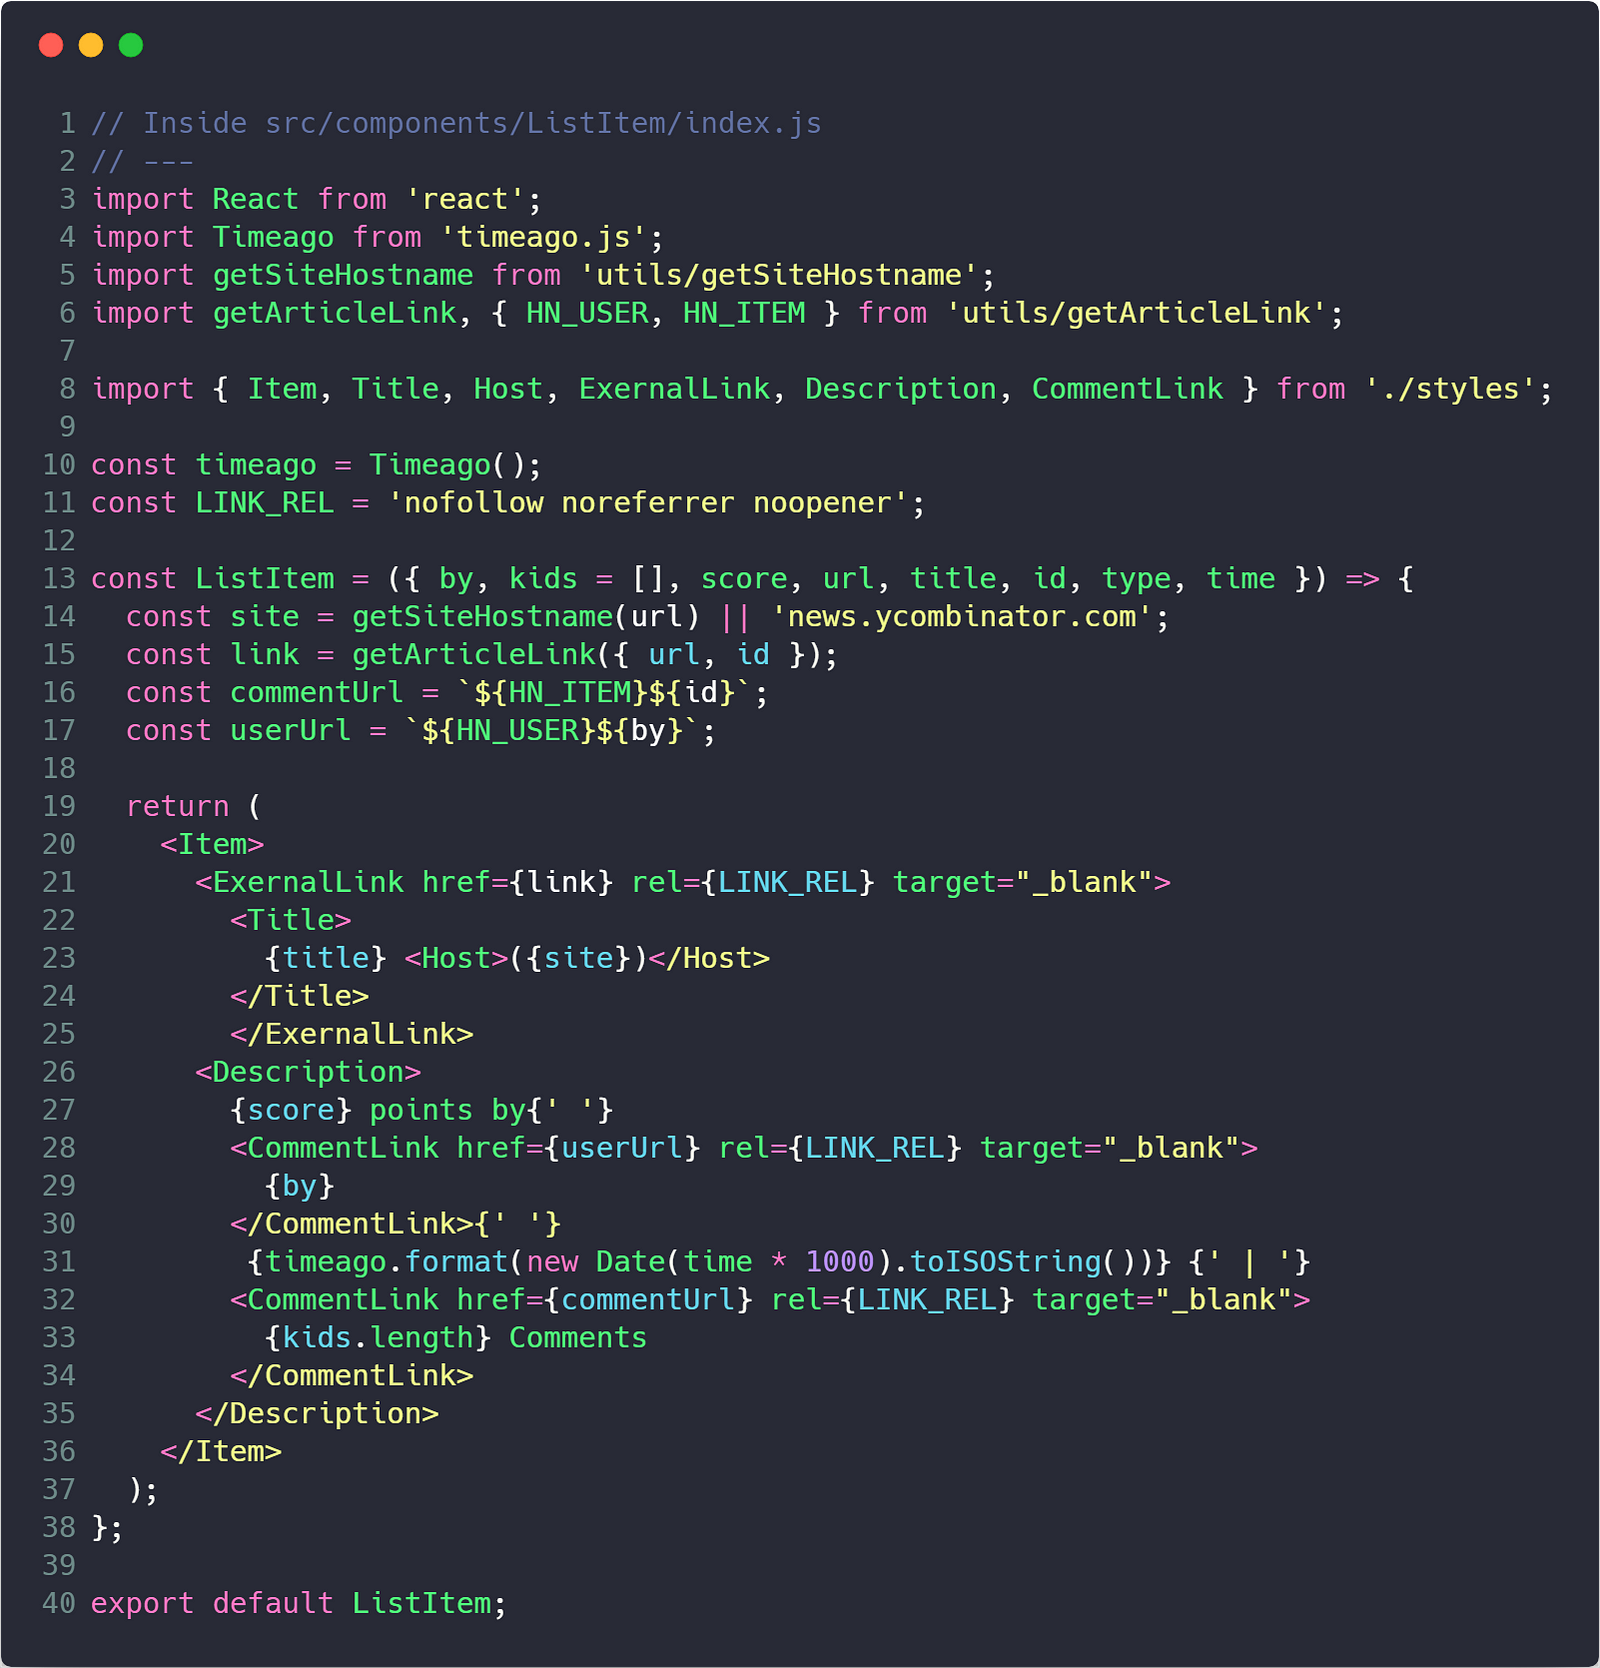
And with that step, we are now displaying the first 20 top Hacker News items in our app — very cool!
Paginating Requests with Infinite Scroll
Now we want to fetch an additional page as the user scrolls down the screen. Recall that every time we successfully fetch stories, we increment the page number in the store, and so after the first page is received, our Redux store should now read page: 1. We need a way to dispatch the fetchStories action on scroll.
To implement infinite scrolling, we’ll use the react-infinite-scroll-component. We will also want a way to determine if we have more pages to load and we can do this in a selector using [reselect](https://www.npmjs.com/package/reselect).
yarn add react-infinite-scroll-component reselectFirst we will build our selector to calculate if more stories exist. Create a src/store/story/selectors.js file. To determine if more stories exist, we see if the array length of the storyIds in our Redux store has the same length as the stories array. If the stories array is shorter, we know that there are more pages.

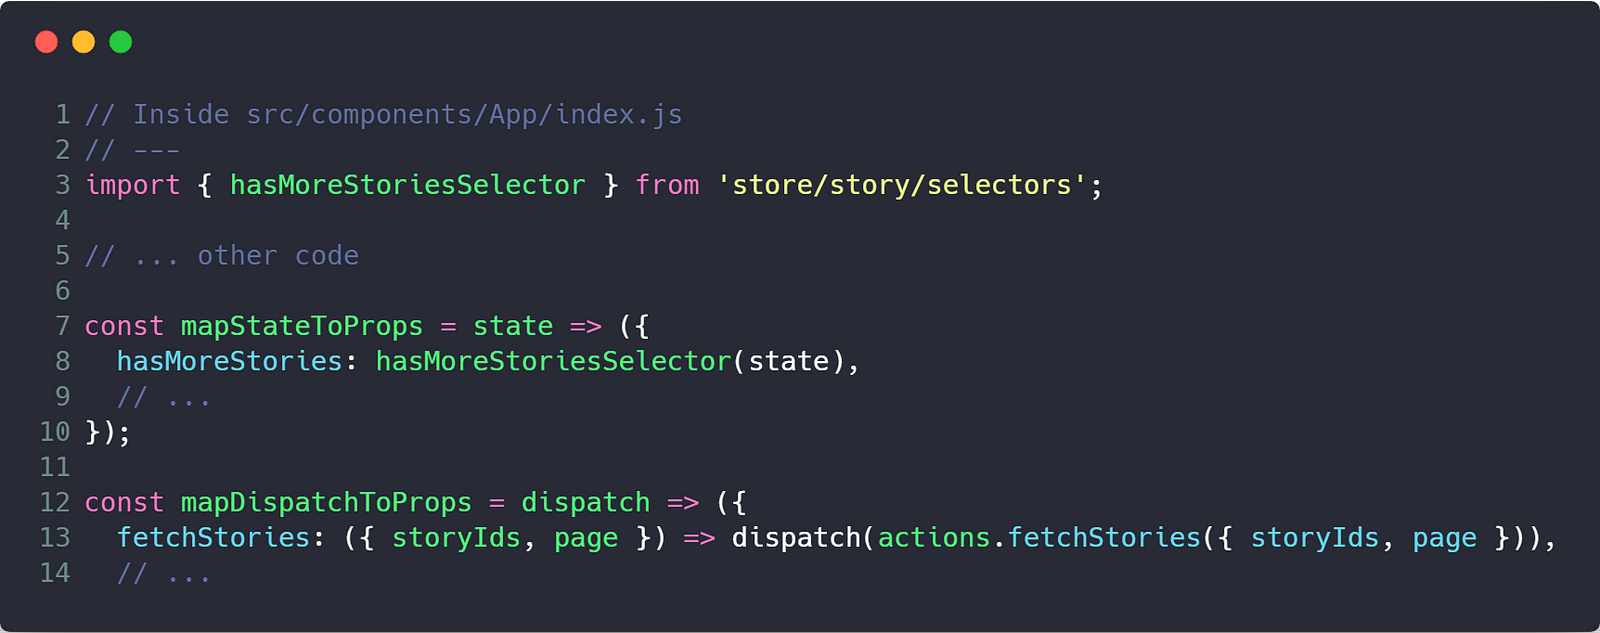
Inside the src/components/App/index.js container, we import the hasMoreStoriesSelector and add a hasMoreStories key to our mapStateToProps. Also, add the fetchStories action to our mapDispatchToProps so we can load them as we scroll.
We will want a loading animation to show while we wait on our API request. Create a src/components/Loader folder and the index.js and styles.js files. We want our animation to be 3 fading dots.

Inside the styles.js file add the following code.

The @keyframes API is a CSS technique to define animations. The Above code shows the abstraction for it in Styled Components. We will have 3 dots on the screen that have their opacity start at 0.2, increase to 1, and then return to 0.2. We add an animation delay to the second and third dot which gives the offset bouncing appearance.
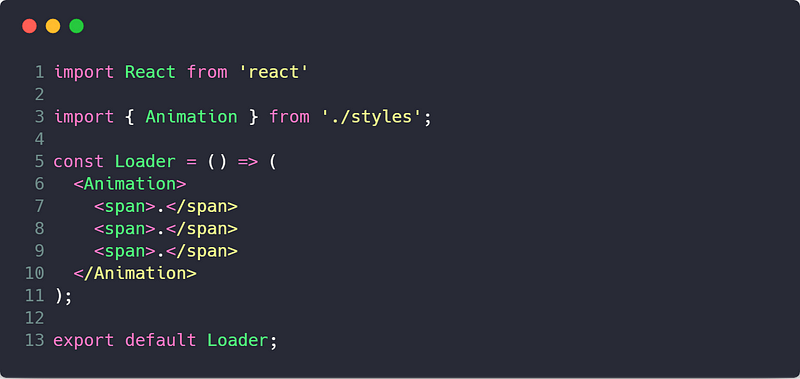
Our Loader component will just be our Animation styled component with 3 spans containing periods.
Now we are ready to add the functionality to our list. Import the infinite scroll module and our Loader in the App component. We will also create a fetchStories callback that will call the fetchStories prop to dispatch the request for the next page. We only call the fetchStories dispatch prop if the isFetching is false. Otherwise we could fetch the same page multiple times. Your src/components/App/App.js should now look like the following.
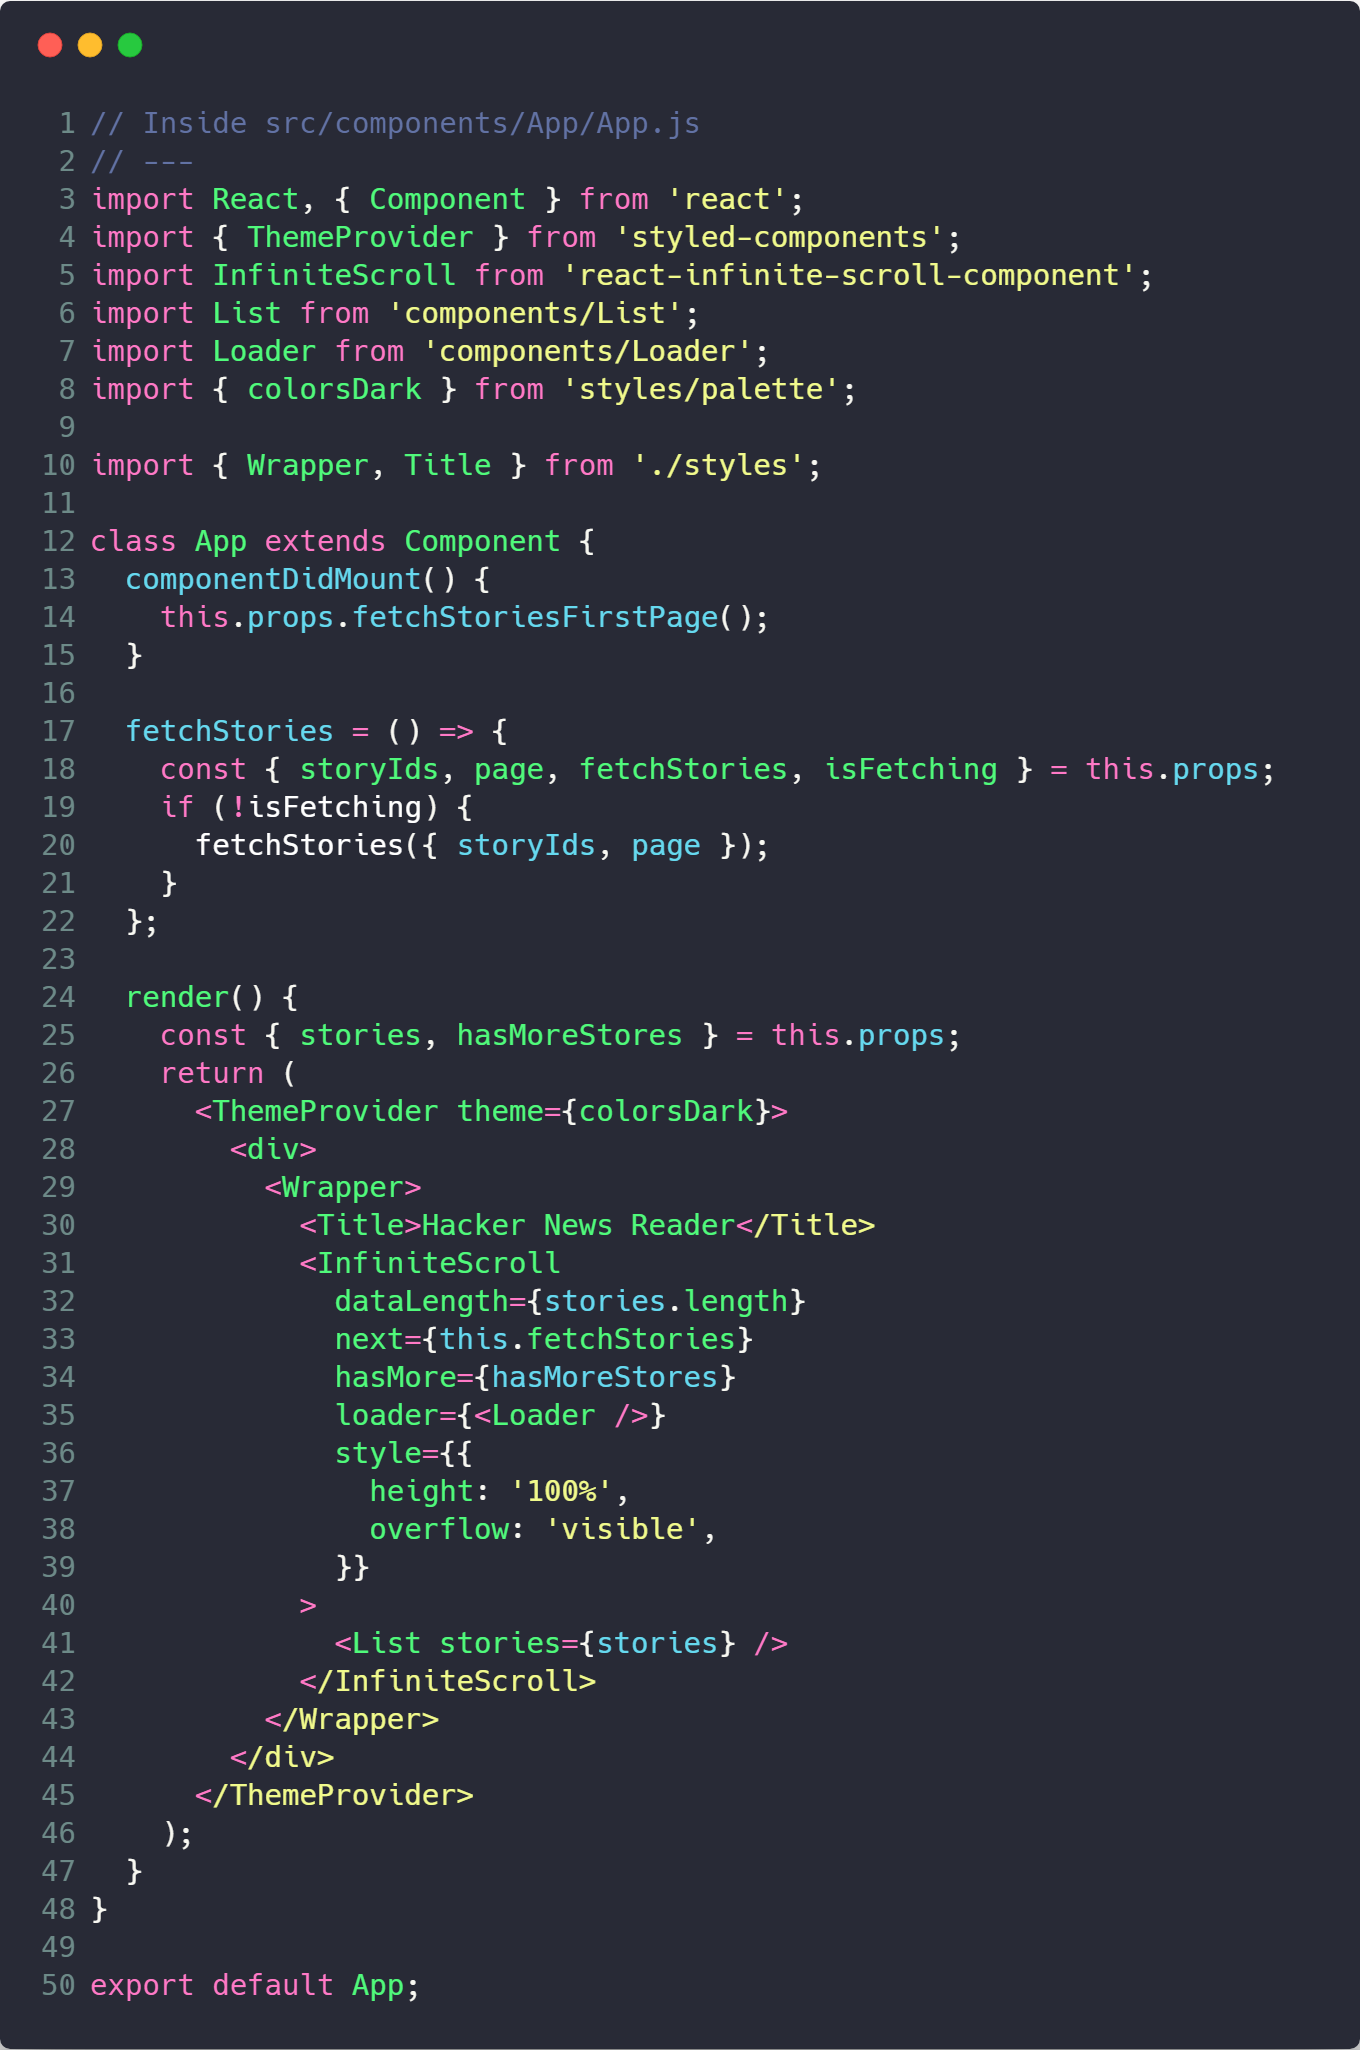
As we scroll down the page, the InfiniteScroll component will call this.fetchStories as long as hasMoreStories is true. When the fetchStories API request returns, the new stories are appending to stories array, adding them to the page.
With this functionality, you can now scroll through the entire list of top stories! high fives
Your Final Challenge
At the beginning of the tutorial, we initialized a theme property in our App reducer. Now I’ll leave it up to you implement the toggle functionality on your own. You will want to add a click event in some component that dispatches the setTheme action and toggles between light and dark. You will want to have a ternary condition on your ThemeProvider component that will pass colorsDark if state.app.theme === 'dark', otherwise use colorsLight.
If you get stuck, refer to the source code to see our implementation, join our Slack and as for help, and try it out on our working solution.
Deploying to GitHub Pages
The final step to any production app is actually pushing it to production. Since all of our functionality is on the client, we can deploy it as a static site for free using GitHub Pages.
Commit all your code and push it to GitHub. I named my repo hn-clone. Follow this guide if you need help with creating the repo and uploading the code.
Now use the following steps to host it on GitHub Pages:
- Add
"homepage": "http://<username>.github.io/<repo-name>"to yourpackage.json. Replace<username>and<repo-name>with the values that you used — my values would betreyhuffineandhn-clone.

- Install
gh-pagesas a dev dependency
yarn add -D gh-pages- Add 2 scripts to your
package.json
"predeploy": "npm run build","deploy": "gh-pages -d build"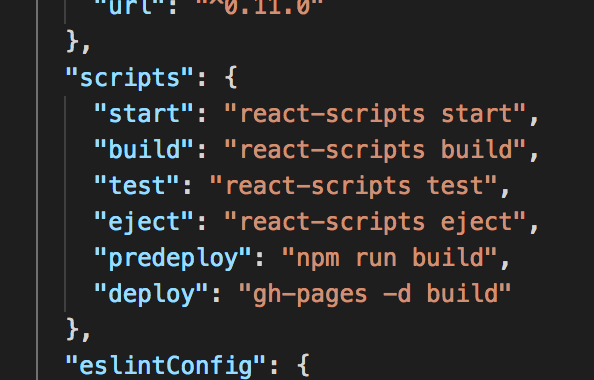
- Finally, run
yarn deployand visit the URL that you specified in the homepage.

And now you have a Hacker News clone in production! double high five
Conclusion
This covers the essential functionality required to build the Hacker News clone. The source code has a few additional features and is continuing to be updated, so check there for some inspiration to continue building out the app and learn more React.
Don’t forget to download the Chrome Extension and visit gitconnected.com to join the developer community.