This article on building a todo app with Angular CLI is the first in a four-part series on how to write a todo application in Angular 2:
- Part 0 — The Ultimate Angular CLI Reference Guide
- Part 1 — Getting our first version of the Todo application up and running
- Part 2 — Creating separate components to display a list of todos and a single todo
- Part 3 — Update the Todo service to communicate with a REST API
- Part 4 — Use Angular router to resolve data
- Part 5 — Add authentication to protect private content
- Part 6 — How to Update Angular Projects to the latest version.

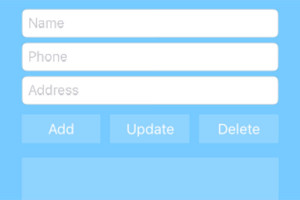
In each article, we’ll refine the underlying architecture of the application and we make sure we have a working version of the application that looks like this:
By the end of this series, our application architecture will look like this:
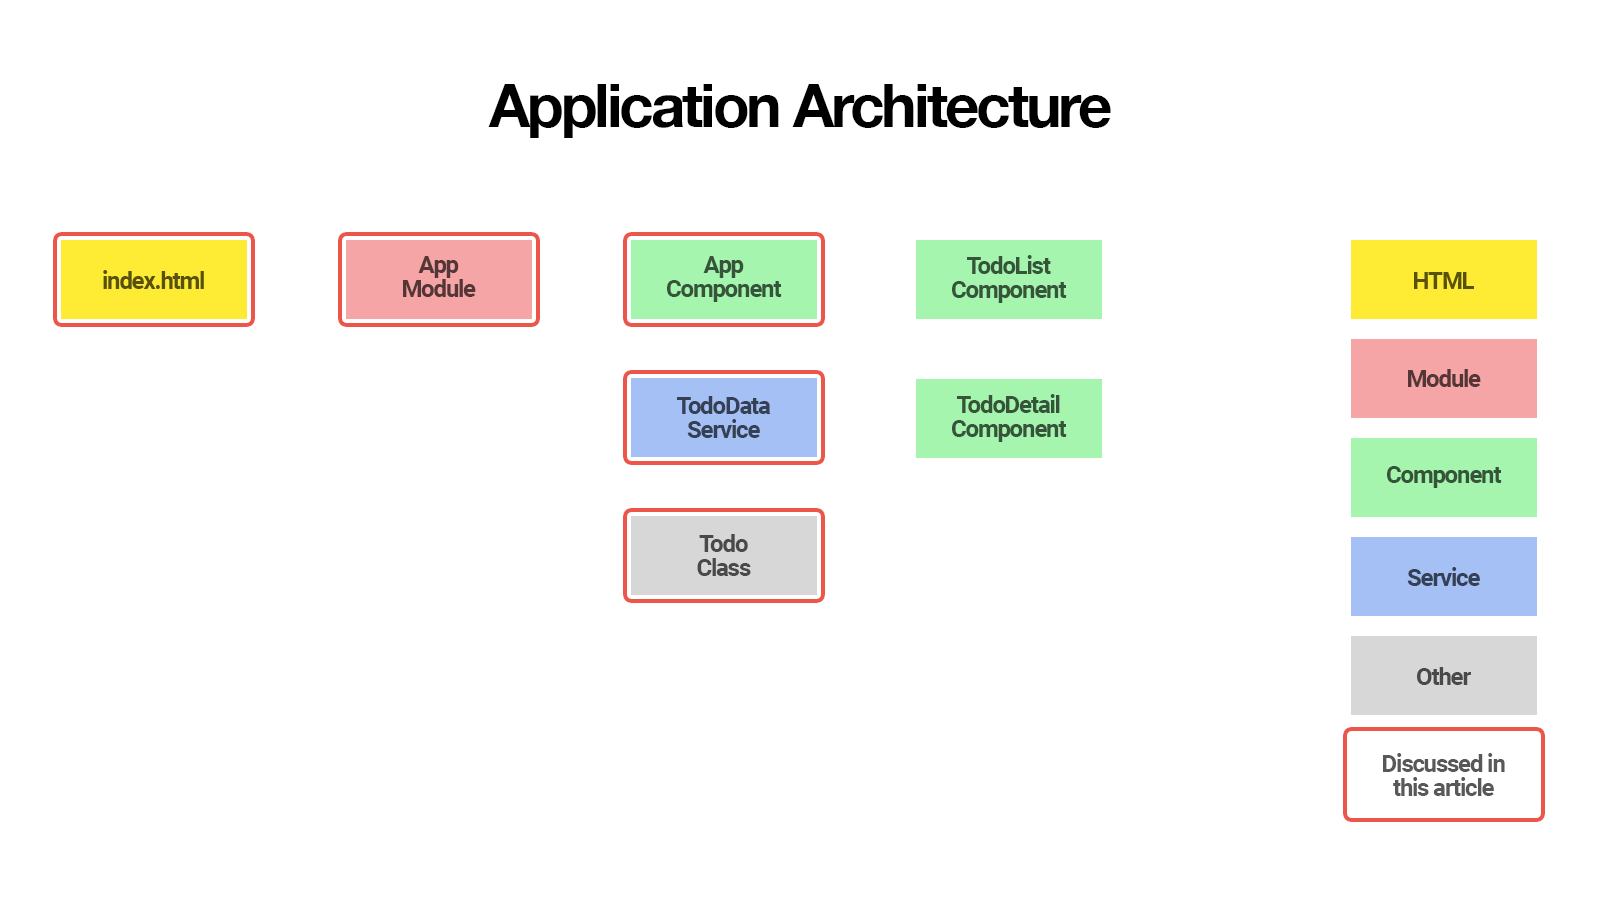
The items that are marked with a red border are discussed in this article, while items that are not marked with a red border will be discussed in follow-up articles within this series.
In this first part, you’ll learn how to:
- initialize your Todo application using Angular CLI
- create a
Todoclass to represent individual todos - create a
TodoDataServiceservice to create, update and remove todos - use the
AppComponentcomponent to display the user interface - deploy your application to GitHub pages
So let’s get started!
Rather than a successor of AngularJS 1.x, Angular 2 can be considered an entirely new framework built on lessons from AngularJS 1.x. Hence the name change where Angular is used to denote Angular 2 and AngularJS refers to AngularJS 1.x. In this article, we’ll use Angular and Angular 2 interchangeably, but they both refer to Angular 2.
As of February 9, 2017, the ng deploy command has been removed from the core of Angular CLI. Read more here.
Initialize Your Todo Application Using Angular CLI
One of the easiest ways to start a new Angular 2 application is to use Angular’s command-line interface (CLI).
To install Angular CLI, run:
$ npm install -g angular-cli
This will install the ng command globally on your system.
To verify whether your installation completed successfully, you can run:
$ ng version
This should display the version you’ve installed:
angular-cli: 1.0.0-beta.21
node: 6.1.0
os: darwin x64
Now that you have Angular CLI installed, you can use it to generate your Todo application:
$ ng new todo-app
This creates a new directory with all files you need to get started:
todo-app
├── README.md
├── angular-cli.json
├── e2e
│   ├── app.e2e-spec.ts
│   ├── app.po.ts
│   └── tsconfig.json
├── karma.conf.js
├── package.json
├── protractor.conf.js
├── src
│   ├── app
│   │   ├── app.component.css
│   │   ├── app.component.html
│   │   ├── app.component.spec.ts
│   │   ├── app.component.ts
│   │   ├── app.module.ts
│   │   └── index.ts
│   ├── assets
│   ├── environments
│   │   ├── environment.prod.ts
│   │   └── environment.ts
│   ├── favicon.ico
│   ├── index.html
│   ├── main.ts
│   ├── polyfills.ts
│   ├── styles.css
│   ├── test.ts
│   ├── tsconfig.json
│   └── typings.d.ts
└── tslint.json
If you’re not familiar with the Angular CLI yet, make sure you check out The Ultimate Angular CLI Reference.
You can now navigate to the new directory:
$ cd todo-app
Then start the Angular CLI development server:
$ ng serve
This will start a local development server that you can navigate to in your browser at http://localhost:4200/.
The Angular CLI development server includes LiveReload support, so your browser automatically reloads the application when a source file changes.
How convenient is that!
Creating the Todo Class
Because Angular CLI generates TypeScript files, we can use a class to represent Todo items.
So let’s use Angular CLI to generate a Todo class for us:
$ ng generate class Todo --spec
This will create the following:
src/app/todo.spec.ts
src/app/todo.ts
Let’s open up src/app/todo.ts:
export class Todo {
}
Next, add the logic we need:
export class Todo {
  id: number;
  title: string = '';
  complete: boolean = false;

  constructor(values: Object = {}) {
    Object.assign(this, values);
  }
}
In this Todo class definition, we specify that each Todo instance will have three properties:
id: number, unique ID of the todo itemtitle: string, title of the todo itemcomplete: boolean, whether or not the todo item is complete
We also provide constructor logic that lets us specify property values during instantiation so we can easily create new Todo instances like this:
let todo = new Todo({
  title: 'Read SitePoint article',
  complete: false
});
While we’re at it, let’s add a unit test to make sure our constructor logic works as expected.
When generating the Todo class, we used the --spec option. This told Angular CLI to also generate src/app/todo.spec.ts for us with a basic unit test:
import {Todo} from './todo';

describe('Todo', () => {
  it('should create an instance', () => {
    expect(new Todo()).toBeTruthy();
  });
});
Let’s add an additional unit test to make sure the constructor logic works as expected:
import {Todo} from './todo';

describe('Todo', () => {
  it('should create an instance', () => {
    expect(new Todo()).toBeTruthy();
  });

  it('should accept values in the constructor', () => {
    let todo = new Todo({
      title: 'hello',
      complete: true
    });
    expect(todo.title).toEqual('hello');
    expect(todo.complete).toEqual(true);
  });
});
To verify whether our code works as expected, we can now run:
$ ng test
This executes the Karma test runner and run all our unit tests. This should output:
[karma]: No captured browser, open http://localhost:9876/
[karma]: Karma v1.2.0 server started at http://localhost:9876/
[launcher]: Launching browser Chrome with unlimited concurrency
[launcher]: Starting browser Chrome
[Chrome 54.0.2840 (Mac OS X 10.12.0)]: Connected on socket /#ALCo3r1JmW2bvt_fAAAA with id 84083656
Chrome 54.0.2840 (Mac OS X 10.12.0): Executed 5 of 5 SUCCESS (0.159 secs / 0.154 secs)
If your unit tests are failing, you can compare your code to the working code on GitHub.
Now that we have a working Todo class to represent an individual todo, let’s create a TodoDataService service to manage all todos.
Creating the TodoDataService Service
The TodoDataService will be responsible for managing our Todo items.
In another part of this series, you’ll learn how to communicate with a REST API, but for now we’ll store all data in memory.
Let’s use Angular CLI again to generate the service for us:
$ ng generate service TodoData
This outputs:
installing service
  create src/app/todo-data.service.spec.ts
  create src/app/todo-data.service.ts
  WARNING Service is generated but not provided, it must be provided to be used
When generating a service, Angular CLI also generates a unit test by default so we don’t have to explicitly use the --spec option.
Angular CLI has generated the following code for our TodoDataService in src/app/todo-data.service.ts:
import { Injectable } from '@angular/core';

@Injectable()
export class TodoDataService {

  constructor() { }

}
and a corresponding unit test in src/app/todo-data.service.spec.ts:
/* tslint:disable:no-unused-variable */

import { TestBed, async, inject } from '@angular/core/testing';
import { TodoDataService } from './todo-data.service';

describe('TodoDataService', () => {
  beforeEach(() => {
    TestBed.configureTestingModule({
      providers: [TodoDataService]
    });
  });

  it('should ...', inject([TodoDataService], (service: TodoDataService) => {
    expect(service).toBeTruthy();
  }));
});
Let’s open up src/app/todo-data.service.ts and add our todo management logic to the TodoDataService:
import {Injectable} from '@angular/core';
import {Todo} from './todo';

@Injectable()
export class TodoDataService {

  // Placeholder for last id so we can simulate
  // automatic incrementing of ids
  lastId: number = 0;

  // Placeholder for todos
  todos: Todo[] = [];

  constructor() {
  }

  // Simulate POST /todos
  addTodo(todo: Todo): TodoDataService {
    if (!todo.id) {
      todo.id = ++this.lastId;
    }
    this.todos.push(todo);
    return this;
  }

  // Simulate DELETE /todos/:id
  deleteTodoById(id: number): TodoDataService {
    this.todos = this.todos
      .filter(todo => todo.id !== id);
    return this;
  }

  // Simulate PUT /todos/:id
  updateTodoById(id: number, values: Object = {}): Todo {
    let todo = this.getTodoById(id);
    if (!todo) {
      return null;
    }
    Object.assign(todo, values);
    return todo;
  }

  // Simulate GET /todos
  getAllTodos(): Todo[] {
    return this.todos;
  }

  // Simulate GET /todos/:id
  getTodoById(id: number): Todo {
    return this.todos
      .filter(todo => todo.id === id)
      .pop();
  }

  // Toggle todo complete
  toggleTodoComplete(todo: Todo){
    let updatedTodo = this.updateTodoById(todo.id, {
      complete: !todo.complete
    });
    return updatedTodo;
  }

}
The actual implementation details of the methods are not essential for the purpose of this article. The main takeaway is that we centralize the business logic in a service.
To make sure the business logic in our TodoDataService service works as expected, we also add some additional unit tests in src/app/todo-data.service.spec.ts:
import {TestBed, async, inject} from '@angular/core/testing';
import {Todo} from './todo';
import {TodoDataService} from './todo-data.service';

describe('TodoDataService', () => {
  beforeEach(() => {
    TestBed.configureTestingModule({
      providers: [TodoDataService]
    });
  });

  it('should ...', inject([TodoDataService], (service: TodoDataService) => {
    expect(service).toBeTruthy();
  }));

  describe('#getAllTodos()', () => {

    it('should return an empty array by default', inject([TodoDataService], (service: TodoDataService) => {
      expect(service.getAllTodos()).toEqual([]);
    }));

    it('should return all todos', inject([TodoDataService], (service: TodoDataService) => {
      let todo1 = new Todo({title: 'Hello 1', complete: false});
      let todo2 = new Todo({title: 'Hello 2', complete: true});
      service.addTodo(todo1);
      service.addTodo(todo2);
      expect(service.getAllTodos()).toEqual([todo1, todo2]);
    }));

  });

  describe('#save(todo)', () => {

    it('should automatically assign an incrementing id', inject([TodoDataService], (service: TodoDataService) => {
      let todo1 = new Todo({title: 'Hello 1', complete: false});
      let todo2 = new Todo({title: 'Hello 2', complete: true});
      service.addTodo(todo1);
      service.addTodo(todo2);
      expect(service.getTodoById(1)).toEqual(todo1);
      expect(service.getTodoById(2)).toEqual(todo2);
    }));

  });

  describe('#deleteTodoById(id)', () => {

    it('should remove todo with the corresponding id', inject([TodoDataService], (service: TodoDataService) => {
      let todo1 = new Todo({title: 'Hello 1', complete: false});
      let todo2 = new Todo({title: 'Hello 2', complete: true});
      service.addTodo(todo1);
      service.addTodo(todo2);
      expect(service.getAllTodos()).toEqual([todo1, todo2]);
      service.deleteTodoById(1);
      expect(service.getAllTodos()).toEqual([todo2]);
      service.deleteTodoById(2);
      expect(service.getAllTodos()).toEqual([]);
    }));

    it('should not removing anything if todo with corresponding id is not found', inject([TodoDataService], (service: TodoDataService) => {
      let todo1 = new Todo({title: 'Hello 1', complete: false});
      let todo2 = new Todo({title: 'Hello 2', complete: true});
      service.addTodo(todo1);
      service.addTodo(todo2);
      expect(service.getAllTodos()).toEqual([todo1, todo2]);
      service.deleteTodoById(3);
      expect(service.getAllTodos()).toEqual([todo1, todo2]);
    }));

  });

  describe('#updateTodoById(id, values)', () => {

    it('should return todo with the corresponding id and updated data', inject([TodoDataService], (service: TodoDataService) => {
      let todo = new Todo({title: 'Hello 1', complete: false});
      service.addTodo(todo);
      let updatedTodo = service.updateTodoById(1, {
        title: 'new title'
      });
      expect(updatedTodo.title).toEqual('new title');
    }));

    it('should return null if todo is not found', inject([TodoDataService], (service: TodoDataService) => {
      let todo = new Todo({title: 'Hello 1', complete: false});
      service.addTodo(todo);
      let updatedTodo = service.updateTodoById(2, {
        title: 'new title'
      });
      expect(updatedTodo).toEqual(null);
    }));

  });

  describe('#toggleTodoComplete(todo)', () => {

    it('should return the updated todo with inverse complete status', inject([TodoDataService], (service: TodoDataService) => {
      let todo = new Todo({title: 'Hello 1', complete: false});
      service.addTodo(todo);
      let updatedTodo = service.toggleTodoComplete(todo);
      expect(updatedTodo.complete).toEqual(true);
      service.toggleTodoComplete(todo);
      expect(updatedTodo.complete).toEqual(false);
    }));

  });

});
Karma comes pre-configured with Jasmine. You can read the Jasmine documentation to learn more about the Jasmine syntax.
Let’s zoom in on some of the parts in the unit tests above:
beforeEach(() => {
  TestBed.configureTestingModule({
    providers: [TodoDataService]
  });
});
First of all, what is TestBed?
TestBed is a utility provided by @angular/core/testing to configure and create an Angular testing module in which we want to run our unit tests.
We use the TestBed.configureTestingModule() method to configure and create a new Angular testing module. We can configure the testing module to our liking by passing in a configuration object. This configuration object can have most of the properties of a normal Angular module.
In this case we use the providers property to configure the testing module to use the real TodoDataService when running the tests.
In part 3 of this series we will let the TodoDataService communicate with a real REST API and we will see how we can inject a mock service in our test module to prevent the tests from communicating with the real API.
Next, we use the inject function provided by @angular/core/testing to inject the correct service from the TestBed injector in our test function:
it('should return all todos', inject([TodoDataService], (service: TodoDataService) => {
  let todo1 = new Todo({title: 'Hello 1', complete: false});
  let todo2 = new Todo({title: 'Hello 2', complete: true});
  service.addTodo(todo1);
  service.addTodo(todo2);
  expect(service.getAllTodos()).toEqual([todo1, todo2]);
}));
The first argument to the inject function is an array of Angular dependency injection tokens. The second argument is the test function whose parameters are the dependencies that correspond to the dependency injection tokens from the array.
Here we tell the TestBed injector to inject the TodoDataService by specifying it in the array in the first argument. As a result we can access the TodoDataService as service in our test function because service is the name of the first parameter of our test function.
If you want to learn more about testing in Angular, be sure to check out the official Angular testing guide.
To verify whether our service works as expected, we run our unit tests again:
$ ng test
[karma]: No captured browser, open http://localhost:9876/
[karma]: Karma v1.2.0 server started at http://localhost:9876/
[launcher]: Launching browser Chrome with unlimited concurrency
[launcher]: Starting browser Chrome
[Chrome 54.0.2840 (Mac OS X 10.12.0)]: Connected on socket /#fi6bwZk8IjYr1DZ-AAAA with id 11525081
Chrome 54.0.2840 (Mac OS X 10.12.0): Executed 14 of 14 SUCCESS (0.273 secs / 0.264 secs)
Perfect— all unit tests ran successfully!
Now that we have a working TodoDataService service, it’s time to implement the actual user interface.
In Angular 2, parts of the user interface are represented by components.
Editing the AppComponent Component
When we initialized the Todo application, Angular CLI automatically generated a main AppComponent component for us:
src/app/app.component.css
src/app/app.component.html
src/app/app.component.spec.ts
src/app/app.component.ts
The template and styles can also be specified inline, inside the script file. Angular CLI creates separate files by default, so that’s what we’ll use in this article.
Let’s open up src/app/app.component.html:
<h1>
  {{title}}
</h1>
Replace its content with:
<section class="todoapp">
  <header class="header">
    <h1>Todos</h1>
    <input class="new-todo" placeholder="What needs to be done?" autofocus="" [(ngModel)]="newTodo.title" (keyup.enter)="addTodo()">
  </header>
  <section class="main" *ngIf="todos.length > 0">
    <ul class="todo-list">
      <li *ngFor="let todo of todos" [class.completed]="todo.complete">
        <div class="view">
          <input class="toggle" type="checkbox" (click)="toggleTodoComplete(todo)" [checked]="todo.complete">
          <label>{{todo.title}}</label>
          <button class="destroy" (click)="removeTodo(todo)"></button>
        </div>
      </li>
    </ul>
  </section>
  <footer class="footer" *ngIf="todos.length > 0">
    <span class="todo-count"><strong>{{todos.length}}</strong> {{todos.length == 1 ? 'item' : 'items'}} left</span>
  </footer>
</section>
Here’s a super-short primer on Angular’s template syntax in case you haven’t seen it yet:
[property]="expression": set property of an element to the value ofexpression(event)="statement": execute statement wheneventoccurred[(property)]="expression": create two-way binding withexpression[class.special]="expression": addspecialCSS class to element when the value ofexpressionis truthy[style.color]="expression": setcolorCSS property to the value ofexpression
If you’re not familiar with Angular’s template syntax, you should definitely read the official template syntax documentation.
Let’s see what that means for our view. At the top there is an input to create a new todo:
<input class="new-todo" placeholder="What needs to be done?" autofocus="" [(ngModel)]="newTodo.title" (keyup.enter)="addTodo()">
[(ngModel)]="newTodo.title": adds a two-way binding between theinputvalue andnewTodo.title(keyup.enter)="addTodo()": tells Angular to executeaddTodo()when theenterkey was pressed while typing in theinputelement
Don’t worry about where newTodo or addTodo() come from yet; we’ll get there shortly. Just try to understand the semantics of the view for now.
Next there’s a section to display existing todos:
<section class="main" *ngIf="todos.length > 0">
*ngIf="todos.length > 0": only show thesectionelement and all its children when there is at least one todo
Within that section, we ask Angular to generate an li element for each todo:
<li *ngFor="let todo of todos" [class.completed]="todo.complete">
*ngFor="let todo of todos": loop over all todos and assign current todo to a variable calledtodofor each iteration[class.completed]="todo.complete": apply CSS classcompletedtolielement whentodo.completeis truthy
Finally, we display todo details for each individual todo:
<div class="view">
  <input class="toggle" type="checkbox" (click)="toggleTodoComplete(todo)" [checked]="todo.complete">
  <label>{{todo.title}}</label>
  <button class="destroy" (click)="removeTodo(todo)"></button>
</div>
(click)="toggleTodoComplete(todo)": executetoggleTodoComplete(todo)when the checkbox is clicked[checked]="todo.complete": assign the value oftodo.completeto the propertycheckedof the element(click)="removeTodo(todo)": executeremoveTodo(todo)when the destroy button is clicked
OK, let’s breathe. That was quite a bit of syntax we went through.
If you want to learn every detail about Angular’s template syntax, make sure you read the official template documentation.
You may wonder how expressions like addTodo() and newTodo.title can be evaluated. We haven’t defined them yet, so how does Angular know what we mean?
That’s exactly where the expression context comes in. An expression context is a context in which expressions are evaluated. The expression context of a component is the component instance. And the component instance is an instance of the component class.
The component class of our AppComponent is defined in src/app/app.component.ts.
Angular CLI already created some boilerplate code for us:
import { Component } from '@angular/core';

@Component({
  selector: 'app-root',
  templateUrl: './app.component.html',
  styleUrls: ['./app.component.css']
})
export class AppComponent {
  title = 'app works!';
}
So we can immediately start adding our custom logic.
We’ll need the TodoDataService service in our AppComponent logic, so let’s start by injecting the service in our component.
First we import TodoDataService and specify it in the providers array of the Component decorator:
// Import class so we can register it as dependency injection token
import {TodoDataService} from './todo-data.service';

@Component({
  // ...
  providers: [TodoDataService]
})
export class AppComponent {
  // ...
}
The AppComponent’s dependency injector will now recognize the TodoDataService class as a dependency injection token and return a single instance of TodoDataService when we ask for it.
Angular’s dependency injection system accepts a variety of dependency injection recipes. The syntax above is a shorthand notation for the Class provider recipe that provides dependencies using the singleton pattern. Check out Angular’s dependency injection documentation for more details.
Now that the components dependency injector knows what it needs to provide, we ask it to inject the TodoDataService instance in our component by specifying the dependency in the AppComponent constructor:
// Import class so we can use it as dependency injection token in the constructor
import {TodoDataService} from './todo-data.service';

@Component({
  // ...
})
export class AppComponent {

  // Ask Angular DI system to inject the dependency
  // associated with the dependency injection token `TodoDataService`
  // and assign it to a property called `todoDataService`
  constructor(private todoDataService: TodoDataService) {
  }

  // Service is now available as this.todoDataService
  toggleTodoComplete(todo) {
    this.todoDataService.toggleTodoComplete(todo);
  }
}
The use of public or private on arguments in the constructor is a shorthand notation that allows us to automatically create properties with that name, so:
class AppComponent {

  constructor(private todoDataService: TodoDataService) {
  }
}
This is a shorthand notation for:
class AppComponent {

  private todoDataService: TodoDataService;

  constructor(todoDataService: TodoDataService) {
    this.todoDataService = todoDataService;
  }
}
We can now implement all view logic by adding properties and methods to our AppComponent class:
import {Component} from '@angular/core';
import {Todo} from './todo';
import {TodoDataService} from './todo-data.service';

@Component({
  selector: 'app-root',
  templateUrl: './app.component.html',
  styleUrls: ['./app.component.css'],
  providers: [TodoDataService]
})
export class AppComponent {

  newTodo: Todo = new Todo();

  constructor(private todoDataService: TodoDataService) {
  }

  addTodo() {
    this.todoDataService.addTodo(this.newTodo);
    this.newTodo = new Todo();
  }

  toggleTodoComplete(todo) {
    this.todoDataService.toggleTodoComplete(todo);
  }

  removeTodo(todo) {
    this.todoDataService.deleteTodoById(todo.id);
  }

  get todos() {
    return this.todoDataService.getAllTodos();
  }

}
We first define a newTodo property and assign a new Todo() when the component class is instantiated. This is the same Todo instance specified in the two-way binding expression of [(ngModel)] in our view:
<input class="new-todo" placeholder="What needs to be done?" autofocus="" [(ngModel)]="newTodo.title" (keyup.enter)="addTodo()">
Whenever the input value changes in the view, the value in the component instance is updated. And whenever the value in the component instance changes, the value in the input element in the view is updated.
Next, we implement all methods we used in our view:
addTodo() {
  this.todoDataService.addTodo(this.newTodo);
  this.newTodo = new Todo();
}

toggleTodoComplete(todo) {
  this.todoDataService.toggleTodoComplete(todo);
}

removeTodo(todo) {
  this.todoDataService.deleteTodoById(todo.id);
}

get todos() {
  return this.todoDataService.getAllTodos();
}
Their implementation is very short and should be self-explanatory as we delegate all business logic to the todoDataService.
Delegating business logic to a service is a good programming practice as it allows us to centrally manage and test it.
Before we try the result in our browser, lets run our unit tests again:
$ ng test
05 12 2016 01:16:44.714:WARN [karma]: No captured browser, open http://localhost:9876/
05 12 2016 01:16:44.722:INFO [karma]: Karma v1.2.0 server started at http://localhost:9876/
05 12 2016 01:16:44.722:INFO [launcher]: Launching browser Chrome with unlimited concurrency
05 12 2016 01:16:44.725:INFO [launcher]: Starting browser Chrome
05 12 2016 01:16:45.373:INFO [Chrome 54.0.2840 (Mac OS X 10.12.0)]: Connected on socket /#WcdcOx0IPj-cKul8AAAA with id 19440217
Chrome 54.0.2840 (Mac OS X 10.12.0) AppComponent should create the app FAILED
        Can't bind to 'ngModel' since it isn't a known property of 'input'. ("">
            <h1>Todos</h1>
            <input class="new-todo" placeholder="What needs to be done?" autofocus="" [ERROR ->][(ngModel)]="newTodo.title" (keyup.enter)="addTodo()">
          </header>
          <section class="main" *ngIf="tod"): AppComponent@3:78
        Error: Template parse errors:
            at TemplateParser.parse (webpack:///Users/jvandemo/Projects/jvandemo/todo-app/~/@angular/compiler/src/template_parser/template_parser.js:97:0 <- src/test.ts:11121:19)
            at RuntimeCompiler._compileTemplate (webpack:///Users/jvandemo/Projects/jvandemo/todo-app/~/@angular/compiler/src/runtime_compiler.js:255:0 <- src/test.ts:25503:51)
            at webpack:///Users/jvandemo/Projects/jvandemo/todo-app/~/@angular/compiler/src/runtime_compiler.js:175:47 <- src/test.ts:25423:62
            at Set.forEach (native)
            at RuntimeCompiler._compileComponents (webpack:///Users/jvandemo/Projects/jvandemo/todo-app/~/@angular/compiler/src/runtime_compiler.js:175:0 <- src/test.ts:25423:19)
            at createResult (webpack:///Users/jvandemo/Projects/jvandemo/todo-app/~/@angular/compiler/src/runtime_compiler.js:86:0 <- src/test.ts:25334:19)
            at RuntimeCompiler._compileModuleAndAllComponents (webpack:///Users/jvandemo/Projects/jvandemo/todo-app/~/@angular/compiler/src/runtime_compiler.js:90:0 <- src/test.ts:25338:88)
            at RuntimeCompiler.compileModuleAndAllComponentsSync (webpack:///Users/jvandemo/Projects/jvandemo/todo-app/~/@angular/compiler/src/runtime_compiler.js:62:0 <- src/test.ts:25310:21)
            at TestingCompilerImpl.compileModuleAndAllComponentsSync (webpack:///Users/jvandemo/Projects/jvandemo/todo-app/~/@angular/compiler/bundles/compiler-testing.umd.js:482:0 <- src/test.ts:37522:35)
            at TestBed._initIfNeeded (webpack:///Users/jvandemo/Projects/jvandemo/todo-app/~/@angular/core/bundles/core-testing.umd.js:758:0 <- src/test.ts:7065:40)
...
Chrome 54.0.2840 (Mac OS X 10.12.0): Executed 14 of 14 (3 FAILED) (0.316 secs / 0.245 secs)
Three tests are failing with the following error: Can't bind to 'ngModel' since it isn't a known property of 'input'..
Lets open up src/app/app.component.spec.ts:
/* tslint:disable:no-unused-variable */

import { TestBed, async } from '@angular/core/testing';
import { AppComponent } from './app.component';

describe('AppComponent', () => {
  beforeEach(() => {
    TestBed.configureTestingModule({
      declarations: [
        AppComponent
      ],
    });
  });

  it('should create the app', async(() => {
    let fixture = TestBed.createComponent(AppComponent);
    let app = fixture.debugElement.componentInstance;
    expect(app).toBeTruthy();
  }));

  it(`should have as title 'app works!'`, async(() => {
    let fixture = TestBed.createComponent(AppComponent);
    let app = fixture.debugElement.componentInstance;
    expect(app.title).toEqual('app works!');
  }));

  it('should render title in a h1 tag', async(() => {
    let fixture = TestBed.createComponent(AppComponent);
    fixture.detectChanges();
    let compiled = fixture.debugElement.nativeElement;
    expect(compiled.querySelector('h1').textContent).toContain('app works!');
  }));
});
The reason Angular complains about not knowing ngModel, is because the FormsModule is not loaded when the AppComponent is instantiated by Karma using the TestBed.createComponent() method.
To learn more about TestBed, make sure to check out the Official Angular documentation on testing.
To make sure Angular also loads the FormsModule when Karma instantiates the AppComponent using TestBed.createComponent(), we must specify FormsModule in the imports property of the Testbed configuration object:
/* tslint:disable:no-unused-variable */

import { TestBed, async } from '@angular/core/testing';
import { AppComponent } from './app.component';
import { FormsModule } from '@angular/forms';

describe('AppComponent', () => {
  beforeEach(() => {
    TestBed.configureTestingModule({
      imports: [
        FormsModule
      ],
      declarations: [
        AppComponent
      ],
    });
  });

  it('should create the app', async(() => {
    let fixture = TestBed.createComponent(AppComponent);
    let app = fixture.debugElement.componentInstance;
    expect(app).toBeTruthy();
  }));

  it(`should have as title 'app works!'`, async(() => {
    let fixture = TestBed.createComponent(AppComponent);
    let app = fixture.debugElement.componentInstance;
    expect(app.title).toEqual('app works!');
  }));

  it('should render title in a h1 tag', async(() => {
    let fixture = TestBed.createComponent(AppComponent);
    fixture.detectChanges();
    let compiled = fixture.debugElement.nativeElement;
    expect(compiled.querySelector('h1').textContent).toContain('app works!');
  }));
});
We now have two failing tests:
Chrome 54.0.2840 (Mac OS X 10.12.0) AppComponent should have as title 'app works!' FAILED
    Expected undefined to equal 'app works!'.
        at webpack:///Users/jvandemo/Projects/jvandemo/todo-app/src/app/app.component.spec.ts:28:22 <- src/test.ts:46473:27
        at ZoneDelegate.invoke (webpack:///Users/jvandemo/Projects/jvandemo/todo-app/~/zone.js/dist/zone.js:232:0 <- src/test.ts:50121:26)
        at AsyncTestZoneSpec.onInvoke (webpack:///Users/jvandemo/Projects/jvandemo/todo-app/~/zone.js/dist/async-test.js:49:0 <- src/test.ts:34133:39)
        at ProxyZoneSpec.onInvoke (webpack:///Users/jvandemo/Projects/jvandemo/todo-app/~/zone.js/dist/proxy.js:76:0 <- src/test.ts:34825:39)
Chrome 54.0.2840 (Mac OS X 10.12.0) AppComponent should render title in a h1 tag FAILED
    Expected 'Todos' to contain 'app works!'.
        at webpack:///Users/jvandemo/Projects/jvandemo/todo-app/src/app/app.component.spec.ts:35:53 <- src/test.ts:46479:58
        at ZoneDelegate.invoke (webpack:///Users/jvandemo/Projects/jvandemo/todo-app/~/zone.js/dist/zone.js:232:0 <- src/test.ts:50121:26)
        at AsyncTestZoneSpec.onInvoke (webpack:///Users/jvandemo/Projects/jvandemo/todo-app/~/zone.js/dist/async-test.js:49:0 <- src/test.ts:34133:39)
        at ProxyZoneSpec.onInvoke (webpack:///Users/jvandemo/Projects/jvandemo/todo-app/~/zone.js/dist/proxy.js:76:0 <- src/test.ts:34825:39)
Chrome 54.0.2840 (Mac OS X 10.12.0): Executed 14 of 14 (2 FAILED) (4.968 secs / 4.354 secs)
Karma warns us that the component instance does not have a property title that equals app works! and that there is no h1 element that contains app works!.
That’s correct because we changed the component logic and template. So lets update the unit tests accordingly:
/* tslint:disable:no-unused-variable */

import { TestBed, async } from '@angular/core/testing';
import { AppComponent } from './app.component';
import { FormsModule } from '@angular/forms';
import { Todo } from './todo';

describe('AppComponent', () => {
  beforeEach(() => {
    TestBed.configureTestingModule({
      imports: [
        FormsModule
      ],
      declarations: [
        AppComponent
      ],
    });
  });

  it('should create the app', async(() => {
    let fixture = TestBed.createComponent(AppComponent);
    let app = fixture.debugElement.componentInstance;
    expect(app).toBeTruthy();
  }));

  it(`should have a newTodo todo`, async(() => {
    let fixture = TestBed.createComponent(AppComponent);
    let app = fixture.debugElement.componentInstance;
    expect(app.newTodo instanceof Todo).toBeTruthy()
  }));

  it('should display "Todos" in h1 tag', async(() => {
    let fixture = TestBed.createComponent(AppComponent);
    fixture.detectChanges();
    let compiled = fixture.debugElement.nativeElement;
    expect(compiled.querySelector('h1').textContent).toContain('Todos');
  }));
});
We first add a unit test to make sure the newTodo property is instantiated correctly:
it(`should have a newTodo todo`, async(() => {
  let fixture = TestBed.createComponent(AppComponent);
  let app = fixture.debugElement.componentInstance;
  expect(app.newTodo instanceof Todo).toBeTruthy()
}));
Then we add a unit test to make sure the h1 element contains the expected string:
it('should display "Todos" in h1 tag', async(() => {
  let fixture = TestBed.createComponent(AppComponent);
  fixture.detectChanges();
  let compiled = fixture.debugElement.nativeElement;
  expect(compiled.querySelector('h1').textContent).toContain('Todos');
}));
Now our tests are running successfully:
$ ng test
WARN [karma]: No captured browser, open http://localhost:9876/
INFO [karma]: Karma v1.2.0 server started at http://localhost:9876/
INFO [launcher]: Launching browser Chrome with unlimited concurrency
INFO [launcher]: Starting browser Chrome
INFO [Chrome 55.0.2883 (Mac OS X 10.12.0)]: Connected on socket /#S1TIAhPPqLOV0Z3NAAAA with id 73327097
Chrome 54.0.2840 (Mac OS X 10.12.0): Executed 14 of 14 SUCCESS (0.411 secs / 0.402 secs)
If you want to learn more about testing, be sure to check out the chapter on Testing in the Official Angular documentation.
Feel free to play around with the live demo to see what the result looks like.
Before we wrap up this article, lets have a look at one last really cool feature of Angular CLI.
Deploying to GitHub Pages
Angular CLI makes it super simple to deploy our application to GitHub Pages with a single command like this:
$ ng github-pages:deploy --message 'deploy(dist): deploy on GitHub pages'
The github-pages:deploy command tells Angular CLI to build a static version of our Angular application and push it to the gh-pages branch of our GitHub repository:
$ ng github-pages:deploy --message 'deploy(dist): deploy on GitHub pages'
Built project successfully. Stored in "dist/".
Deployed! Visit https://sitepoint-editors.github.io/todo-app/
Github pages might take a few minutes to show the deployed site.
Our application is now available at https://sitepoint-editors.github.io/todo-app/.
How awesome is that!
Summary
Angular 2 is a beast, no doubt. A very powerful beast!
In this first article, we learned:
- how to kickstart a new Angular application using Angular CLI
- how to implement business logic in an Angular service and how to test our business logic with unit tests
- how to use a component to interact with the user and how to delegate logic to a service using dependency injection
- the basics of Angular template syntax, briefly touching on how Angular dependency injection works
- finally, we learned how to quickly deploy our application to GitHub Pages
There’s a lot more to learn about Angular 2. In the next part of this series, we’ll have a look at how we can create separate components to display a list of todos and individual todo details.
So stay tuned for more about this wonderful world of Angular 2.
Frequently Asked Questions (FAQs) about Angular 2 Tutorial
How do I start with Angular 2 from scratch?
Starting with Angular 2 from scratch involves a few steps. First, you need to set up your development environment. This includes installing Node.js and npm, which are essential for Angular development. Next, install Angular CLI, a command-line interface for Angular, which helps in creating projects, generating application and library code, and performing a variety of ongoing development tasks such as testing, bundling, and deployment. Once your environment is set up, you can create a new project by running the command ‘ng new my-app’. This will create a new directory named ‘my-app’ with a new Angular application. You can then serve the application with the command ‘ng serve’.
What are the key concepts in Angular 2?
Angular 2 introduces several key concepts that are different from AngularJS. These include Components, Directives, Modules, Services, and Dependency Injection. Components are the building blocks of Angular applications. They control a patch of the screen called a view. Directives are markers on a DOM element that tell Angular to attach a specified behavior to that DOM element or even transform the DOM element and its children. Modules are a way to group directives, services, and components related to a specific application. Services are a set of code that can be shared by different components of an application. Dependency Injection is a design pattern in which a class requests dependencies from external sources rather than creating them itself.
How do I create a To-Do list in Angular 2?
Creating a To-Do list in Angular 2 involves creating a component for the list, a service for managing the list, and a model for the list items. The component will handle the user interface and user interaction, the service will handle data management and business logic, and the model will define the structure of a list item. You can use the Angular CLI to generate the component and service. The model can be a simple TypeScript class. Once these are set up, you can use Angular’s data binding features to bind the component’s template to the service’s data.
How do I use Angular CLI?
Angular CLI is a command-line interface for Angular. It helps in creating projects, generating application and library code, and performing a variety of ongoing development tasks such as testing, bundling, and deployment. You can install Angular CLI globally on your machine with the command ‘npm install -g @angular/cli’. Once installed, you can create a new Angular project with the command ‘ng new my-app’. This will create a new directory named ‘my-app’ with a new Angular application. You can then serve the application with the command ‘ng serve’.
How do I handle user input in Angular 2?
Handling user input in Angular 2 is done through event binding. Event binding allows you to define how user input such as clicks or key presses should be handled. For example, you can define a method in your component that should be called when a button is clicked. You can then bind this method to the button’s click event using Angular’s event binding syntax. This would look something like this in your component’s template: ‘<button (click)=”myMethod()”>Click me’. In this example, ‘myMethod’ is a method defined in your component.
How do I use forms in Angular 2?
Angular 2 provides two ways to work with forms: template-driven forms and reactive forms. Template-driven forms are simple to use and are suitable for simple scenarios. They are easy to add to an app, but they do not scale as well as reactive forms. Reactive forms are more robust, scalable, reusable, and testable. They are more suitable for complex scenarios. Both types of forms make use of two-way data binding, validation, and error handling.
How do I use routing in Angular 2?
Routing in Angular 2 is handled by the RouterModule. The RouterModule provides a service called Router that allows you to define navigation paths among your application’s components. You can define your routes in a separate routing module or directly in your application’s main module. Once your routes are defined, you can navigate to different components by using the RouterLink directive in your templates or the navigate method of the Router service in your components.
How do I use services in Angular 2?
Services in Angular 2 are classes that provide specific functionality that can be shared across components. Services can be used to share data, implement application logic, or connect to a backend server, among other things. You can create a service using the Angular CLI with the command ‘ng generate service my-service’. Once the service is created, you can inject it into any component that needs it by adding it to the component’s constructor.
How do I test my Angular 2 application?
Testing in Angular 2 is done through the Jasmine test framework and the Karma test runner. Jasmine provides functions to help you write tests, and Karma provides a test environment where you can run your tests. You can write unit tests for your components, services, and other parts of your application. You can also write end-to-end tests that simulate user interaction with your application. The Angular CLI provides commands to run your tests: ‘ng test’ for unit tests and ‘ng e2e’ for end-to-end tests.
How do I deploy my Angular 2 application?
Deploying an Angular 2 application involves building the application for production and then transferring the built files to a web server. You can build your application for production with the Angular CLI command ‘ng build –prod’. This will create a ‘dist’ directory in your project with the built files. You can then transfer these files to your web server. If your web server is configured correctly, it should serve your Angular application when accessed through a web browser.
 Jurgen Van de Moere
Front-end Architect at The Force - specializing in JavaScript and AngularJS. Developer Expert at Google. Gymnast. Dad. Family man. Creator of Angular Express.
 Todd Motto
Owner and trainer at Ultimate Angular, empowering 40,000+ developers to become Angular experts through online courses. Google Developer Expert for Angular and Web Technologies.